GA4 Set Up & Guide (Updated 2023-06-21)
Jump to any part of the article easily!
GA 4 Configuration Overview
Google Analytics 4 (GA4) setup from top to bottom. We’re going to help you set this up and understand the important parts of GA4.
It is time to set up your Google Analytics 4 (GA4) and do everything. We will walk you through the setup.
Google has done a migration series you can also watch. It is also linked through the article and provides some helpful info. See the series here [GA4] Configure your GA4 property using Setup Assistant.
By the end of this article, you’ll have created and set up Google Analytics 4 (GA4) trakcing. You’ll learn how to set up conversion tracking and you will be migrated over from Universal Analytics and have your GA4 tracking set up.
Most important thing you need to know, get your head, and remember. GA4 events are triggered as users interact with your site or app. Depending on where you are in the process will determine what you need to do first, second, and third.
Quick overview of Article
What we’ll be discussing through the article.
- Simple Understanding of GA4 property
- Walk-through the new GA4 property
- Setup and migration walk-through
- Audiences & Linking Accounts to GA4
GA4 is designed to measure events or, more simply, people’s actions on your website.

Why is GA4 Important
Why is this important? Because each step of a journey begins with a step, and each step takes us (the consumer) to a place where we get something desired.
If we follow the journey and then make improvements on our website, we can make the next person’s journey easier.
Many of us research a product on our phones and then purchase it on our home computers (for example).
Measuring your custom journey allows you to discover what you need to fix and where you can try to improve.
The correct elements setup will get you business and new customers.
What you need to know. First, you need to create a new property in your Google Analytics account if you still need to. Yup, it is that easy, and I’ll show you how.
Every old analytics video on YouTube will be obsolete in the coming weeks. Bookmark this blog post and return if you need help or have questions about setting up your GA4 account. The videos and step-by-step guides below will help you.
There has never been a better time to get in there and learn a little about analytics. We’re all learning together!
GA4 Evolution
Google Analytics 4 (GA4) is now the default option when logging in to your Google Analytics account.
In the past, we were using Universal Analytics (UA-XXX). It is still available to refer to and will be available for 6 months and possibly archived.
Many have been running GA4 in parallel with universal Analytics (or Google Analytics 3, GA3). For a time, but the big push is now. Cut off day for being able to do GA4 set up (slightly more quickly) is days away.
GA4 is the evolution of Google Analytics and will help us see the future.
Call your old data, Old data! Keep it, refer to it, but universal analytics is in the past. We’re starting fresh.
Let’s answer some quick questions before we dive into setup
What, Why, How, GA4?
GA4 is the next-generation analytic platform! The new way to measure!
It is entirely different from our old system’s Universal Analytics (UA). It measures differently. It is built for a cookieless, which means a more private personal digital future for all online.
Why You Must Setup Up a GA4 Property
This is Google’s answer for a new way to track and measure your website and app information/data. It is a significant change. A breaking change.
Why is it a breaking change? Because the system measures differently and counts different elements differently. You have to create a new property in your Google Analytics account.
Your old data will not flow into it because it is an entirely new system.
GA4 measures events. Each event is an action (like scrolling or clicking). Some events are more important to us than others are not.
Suppose an event is important to us (for example, filling out a form or booking a meeting). In that case, we can make the event an event conversion, letting the system know that action is essential and that we want to track it to get more.
That is GA4 in a nutshell. Once set up, you don’t need to worry, and you can measure!
What Is Different In GA4
That, my friend, is a loaded question.
Everything has changed from how you set it up to how it looks (when you dig in), and even language has changed. Things loved from the Universal Analysis aren’t there. Other things are easier to create (like audiences – more on later).
Page views aren’t in the same place. Where is the bounce rate? You have to hunt for what you are looking for, but this is just because we are beginning, so take it in stride. The game plan is – to poke around and have fun.
Don’t worry. It all will make sense. We’re in it together.
It looks similar at first glance, but it is vastly different. Everything is different.
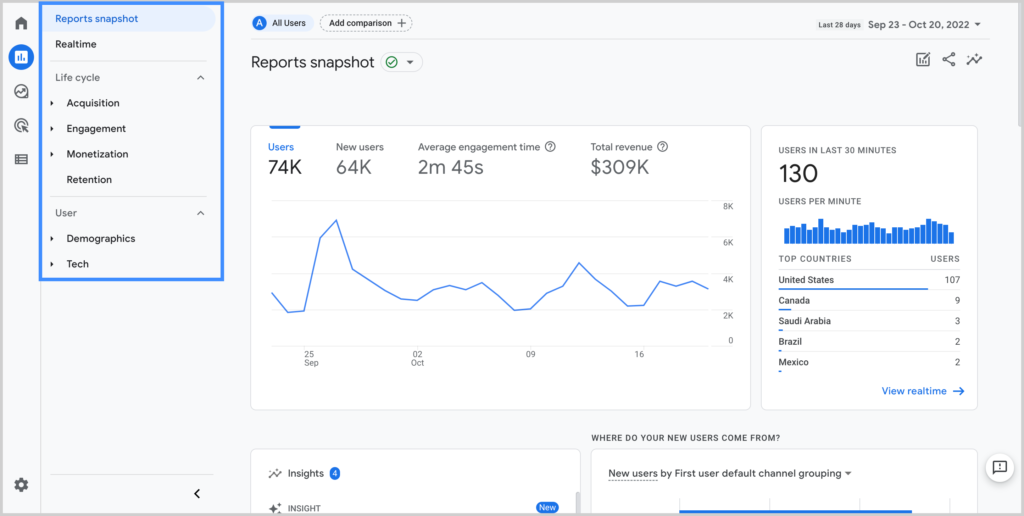
The main menu along the left-hand side has changed and is simple.
Names & Reports Have Changed
The bounce rate is the engagement rate. Page views are pages and screens.
There are no property views! So get used to that. Oh, and the admin section is different too.
E-commerce plays a much more significant role, and the reports have changed. The area is now called Advertising, and another area is called Explore.
Things are different. We can do way more now, which means we can get much smarter about our decision-making and marketing efforts.
GA4 Flexability
There is more flexibility and more customization.
What all the above means – we’ll all get used to it together. Like all other Google products, there will be updates and changes, so the more you get familiar with it, the better off we are. The more you’re willing to poke around and learn, the better.
Plus, having a data analyst and strategist in your back pocket is helpful too. That’s us. We help with all of that (hence the how-to article below).
You’ll probably catch yourself saying I can’t find it! And you might say this a lot when you get started. If you get stuck, stick with it. If you need help, we are here. Take it step by step, and contact us if you need assistance
GA4 Setup Explanation
Setting up GA4 will allow us to explore the new Google Analytics.
There are a few ways to set yourself up, depending on where you are in the process.
This article might be a little before or after you set it up. If things look slightly different, don’t fret. We update this article often and just click around. If a button has moved, no stress. Just click around. You’ll likely find what you’re looking for easily.
What is Essential To Know in GA4 set up?
These are just the things to start wrapping your head around. It is built with machine learning (AI). New and Better Data Collection is what it is all about.
The new Google Analytics property type includes expanded predictive insights, deeper integration with Google Ads, cross-device measurement capabilities and more granular data controls. We’ll have a complete view of our customers and their actions (events).
We’ll be able to do better retargeting! Yay! This is impressive news (more on this in the audience section). If you know how hard it was to create audiences in UA, you know! It is much easier to create audiences in GA4.
A complete understanding from acquisition to retention. And how customers engage with our businesses across devices and channels is something we’ll see. Sounds sexy, right?! (haha, I know, it sounds weird and slightly awkward! But ya gotta love learning what works and creating a strategy around that.)
Some of the features in GA4
- New AI-powered insights/predictions
- Deeper audiences integration with GA (Google Ads)
- YouTube Integration!
- Will report on actions from YouTube-engaged views that occur in-app as well as on the web
- Customer lifecycle-framed reporting
- Codeless Event tracking (yay!)
- Analytics in a cookie-less Future
- Advantage of modelling.

As the days become weeks, we’ll see more advantages come down the pike.
GA 4 Points Of Interest & Layout
The Layout
The layout and design are sleek and similar to the UA but look closely! It has dramatically changed!
Home
The home option or screen is a quick overview of everything. All the little reports will take you to other sections within the software. You will always land on this page (most likely anyway) and go from there.
Report
This is a Wow. So different and so fun! So much info. Once you’re collecting data, this is a place to click around. Take it in. Play and be curious!
Where and how many people have visited your website over the last 30 minutes? They’ve put a lot more emphasis here. There are sources, event counts and users in real-time (or mostly real-time). The more familiar we become, the better off we are. You need to start getting a feel for the software. So jump in and join us. Log into Google Analytics, and let’s look around.
Explore
What is this new section? But we’re just going to slide through, click around, and then leave. There is a gallery option to go into (blue hyperlinked text) and a few reports to check out. Because it looks overwhelming, we’ll skedaddle and return when we’re more familiar. This will take time to get used to.
Advertising
The conversion path. What we loved most about Google Analytics is only a few clicks from the home screen. It is fantastic to see how many times people come to the website and how many different ways.

Now. These are just the things to start wrapping your head around
Bounce Rate In GA4 Where Did It Go?
Last but not least, we have to mention the bounce rate because it is no more! The bounce rate was something to note in UA. It helped us see if something was broken. A bounce rate below 10% would mean a tracking issue or 90% is also a reason to double-check your tracking.
While I am on the subject of tracking. Tracking sometimes breaks, or a plug-in adds a second tag or your business partner does. Or you can get a spam or bot attack which can screw up your data collection. It happens. It is important to fix it and have someone who can help you with this. That’s where we come in front and center. Message us if you have questions.
The bounce rate is now called the engagement rate. This new engagement information gives us deeper and more relevant info on this in the future. How do you get there in your report in Google Analytics?
How to get there: Reports > Life cycle > Overview >Engagements.
Let’s do it. Get GA4 set up – Step-by-Step Walkthrough. If you’d like the step-by-step text to walk through, follow along with the video.
Go over to Google Analytics
Need help setting this up? Send us a message.
Step-By-Step GA4 Setup & Configuration Guide
How To Create, install, Setup & Connect GA4. This is your How To. You’ll learn how to install and get GA4 set up (Google Analytics 4) in a snap.
Here are the things you will need to have access to:
- Google Analytics Account (you’ll need admin access). Account login Google Analytics or get Analytics Help for more info).
- Google Tag Manager (you’ll need Publishing Permissions – Users and Permissions – Tag Manager Help).
Go to Google and type Google Analytics into Chrome or whatever browser you use. If you already have an account, log in.
If you don’t have an account yet, don’t worry; we’ll create one.
First Step: Create A Google Analytics Account
Jump to Step 2 If You Already Have a Google Analytics account!
What we’re going to do first is we’re going to set up Google Analytics for the very first time.
We will create and connect a brand new Google Analytics property to Tag Manager. Once the code is on our website, we can send events about what our users do to Google Analytics for processing.
Sign Up
Go over to Google and type Google Analytics.
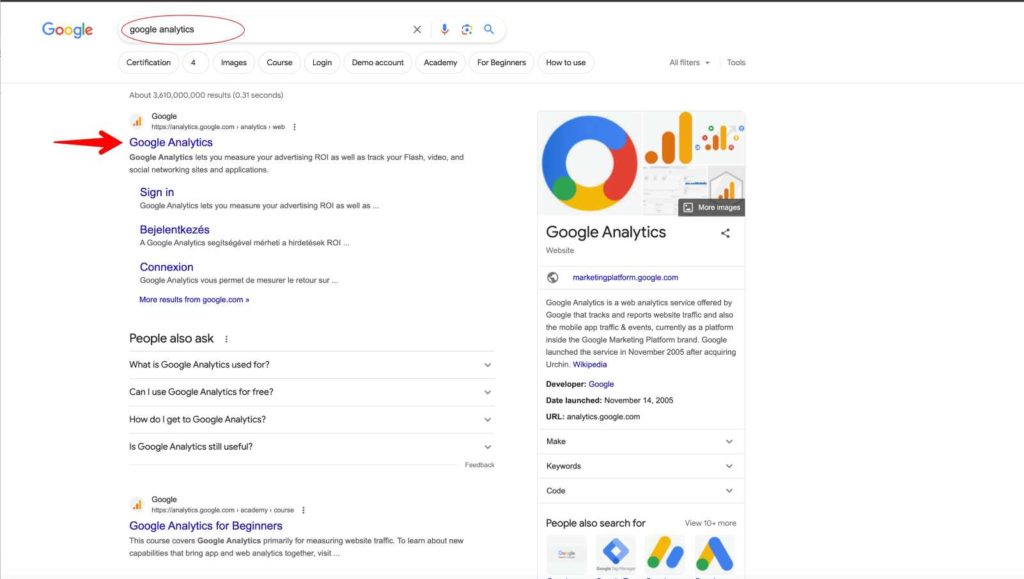
If you don’t have an account sign up. It is super easy. You’ll be taken to the screen that looks like the image below.

Click the Start measuring blue button. You can follow the beginning of this video from Google too.
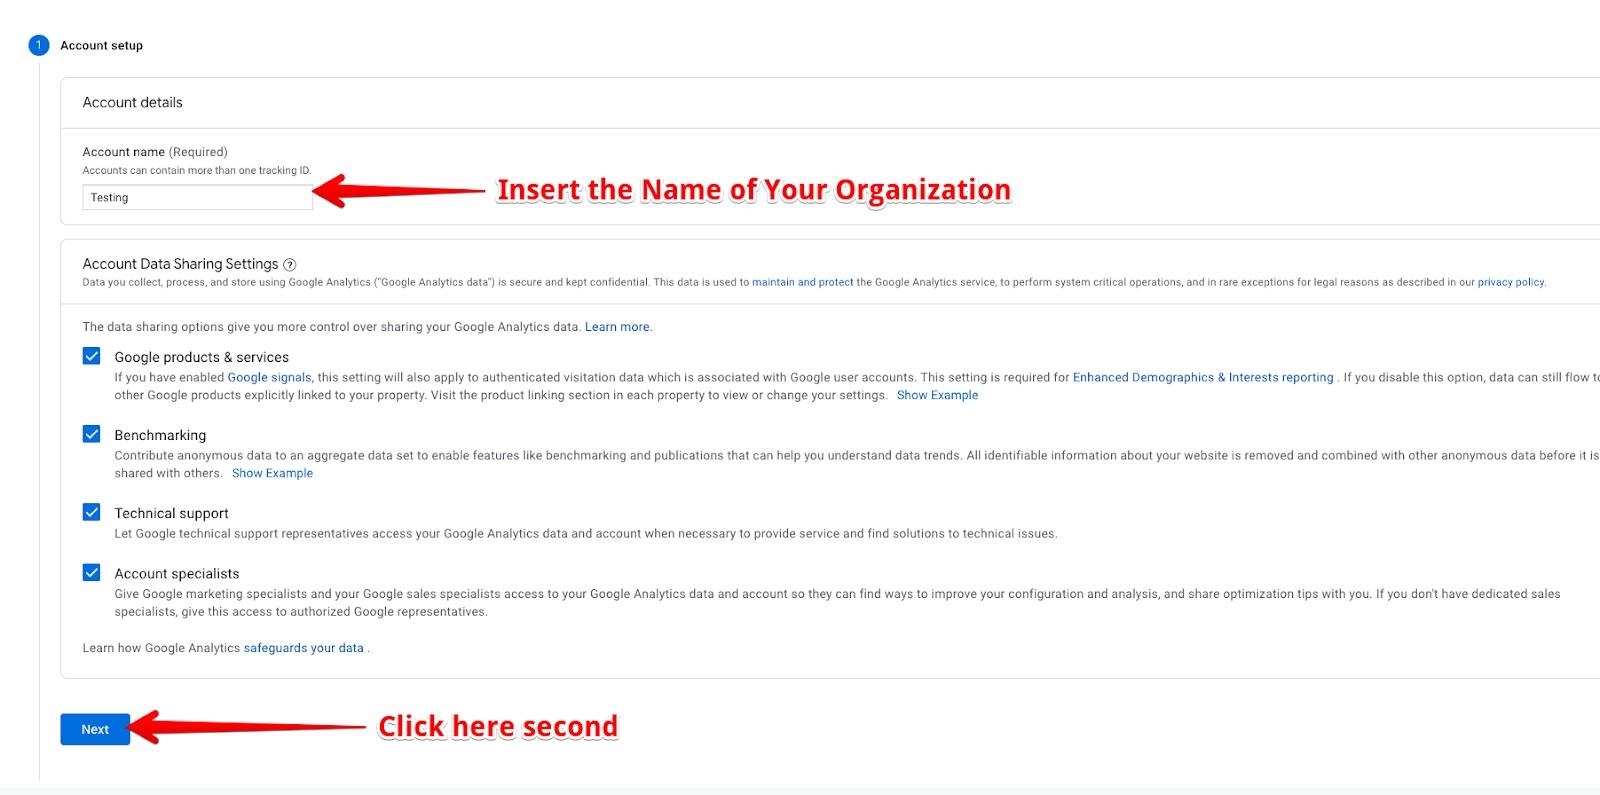
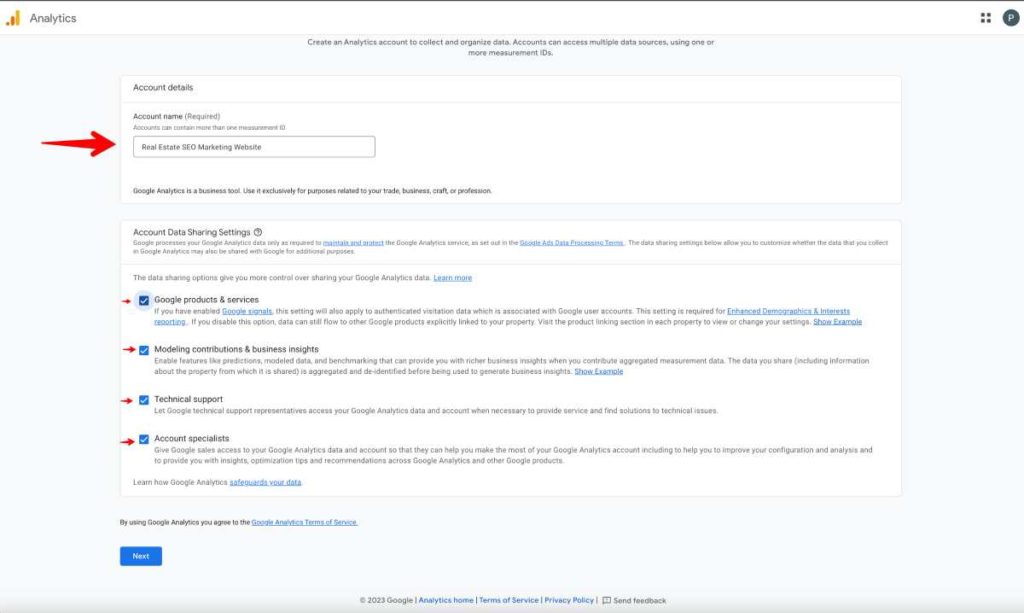
Add Your Organizations Name
Add your organization’s name and check off the boxes you want to check off. Read what they say. There is no wrong answer here. Then click the blue button Next at the bottom of the page.
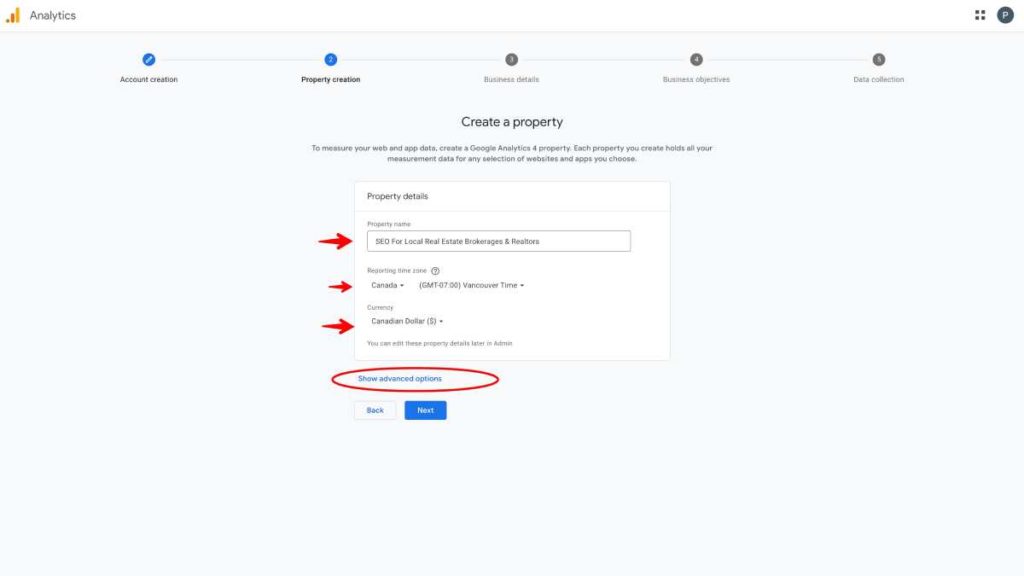
Add Property Details – Property Settings
You are automatically taken to a Google Analytics 4 property setup detail area.
- Add “Your website Name.” As the property name
- Click all the boxes
- click next
Add the property name, select your country, time zone and currency.
Add your property details to measure your web and app data, create a Google Analytics 4 property. Then click on Advanced option. If you click on the advanced options it will pop open a window telling to that the Universal Analytics property will stop working so ignore that advanced option. Click next.
If you do want to click on the advanced options you can. Just add your URL and click on the boxes you want.
Advanced Setting Options
- If you do want to click on the advanced options you can.
- Toggle on the setting top right. Then add your URL and click on the boxes you want.
- Add your website’s URL (your domain)to the first box. Currently right now it is saying create both a Google Analytics and a Universal Analtyics property.
- Click next

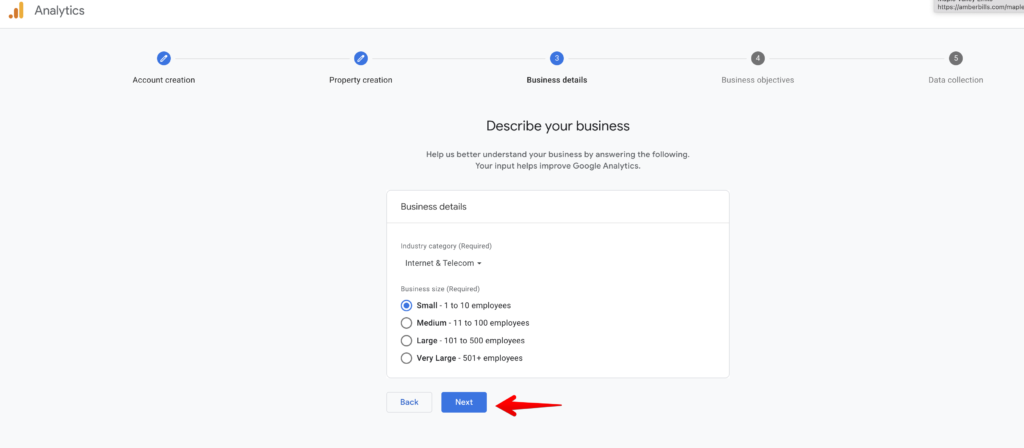
Business Information
Fill in your business information. Category first, you have to pick an option that is there.
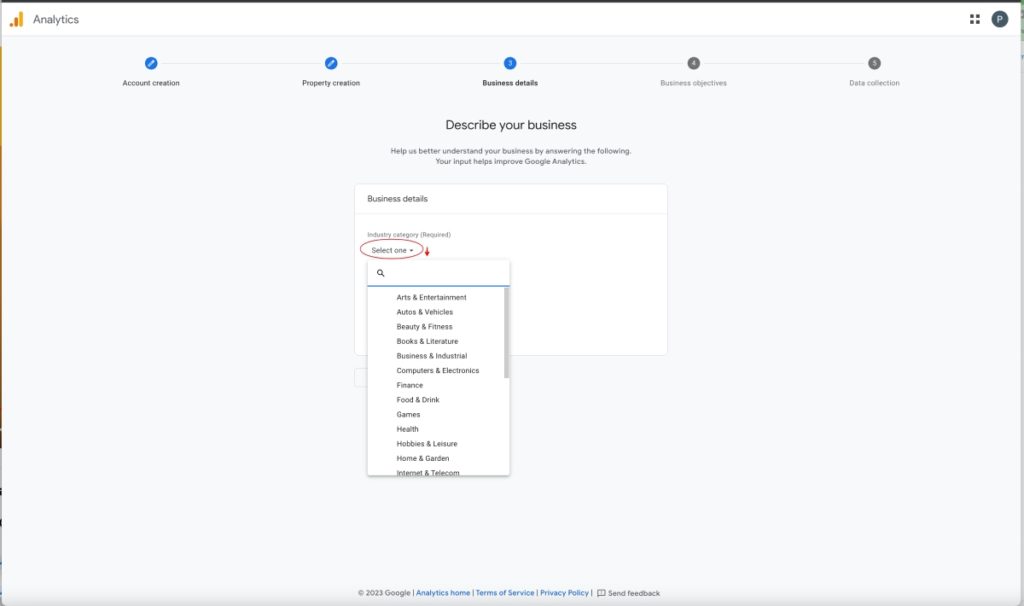
Then add the size and hit next.
Reporting Choices
Choose your reporting. The last option can’t be combined with the others. You will be able to add and see reports later so it doesn’t matter what you choose. Your choices will be based on what you included as your business category.

Choose your reporting. The last option can’t be combined with the others if you choose it. You can add and see reports later, so your choice doesn’t matter. The reports you are offered are included because of the business category you chose.
Click create.
Google Analytics Terms of Service Agreement
You have to agreen to Google Analytics Terms of Service Agreement.
1. Select country/ region.
2. select “I also accept t”he Data Processing Terms as required by GDPR checkbox an
3. then the 2nd check box that says you accept the Data Protection Terms.
Then click “I Accept.”

You just set up your Google Analytics Account and a Google Analytics property! Bam! Pop the cork! You did it! Please have a quick break. We need to get your data stream set up and connected.

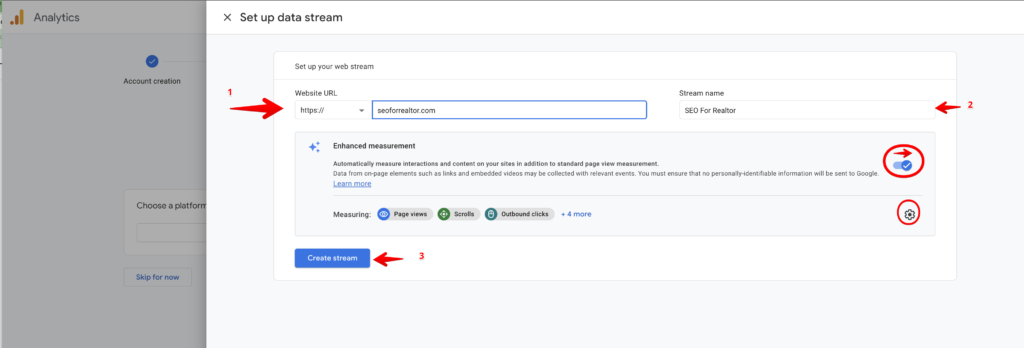
Choose a platform – choose web. Add your website and business name.
We’re going to setup the Web data stream
Two windows will slide open from the right to left to see options. All we want to do is grab a piece of code and save it.

Click create stream.
Data Streams
You’ve already created a Google Analytics account and a Google Analytics property.
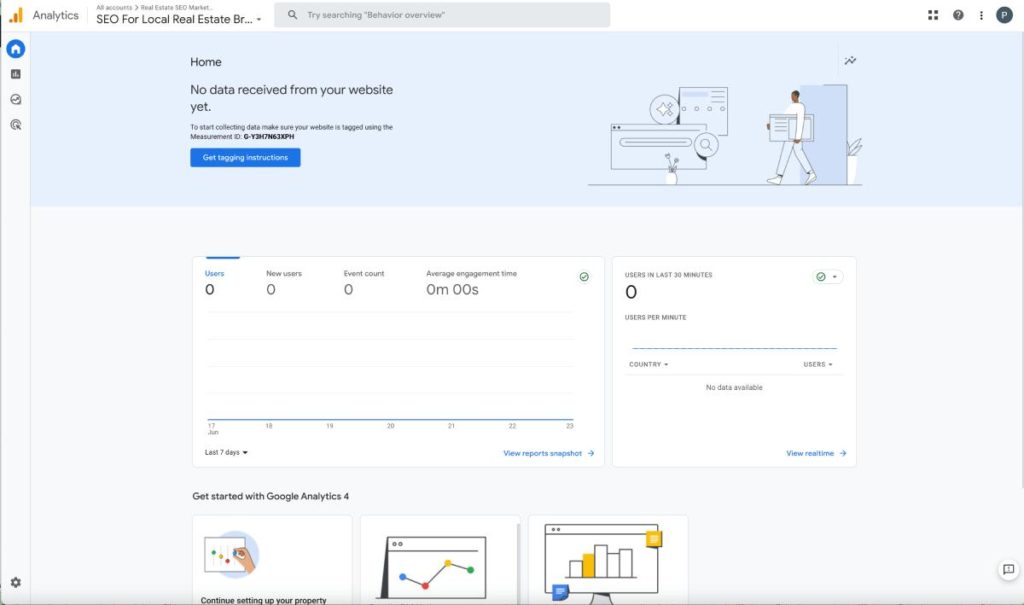
And once you do that, you’re going to end up
on a page that looks like this. And it’s going to be saying that, hey, we don’t have any data right now.
You need to set up a data stream.
What is a Data Stream?
All that data stream is is a source of data that we’re going to feed into Google
Analytics for processing. Then Google Analytics can use that data to provide us
with reports, which will in turn provide us with insights about what’s happening on our website.
A data stream helps us understand what’s happening on our website. There are two types of streams: web streams and app streams. In our case, we’ll focus on websites.
When we create a data stream, Google Analytics provides us with a small piece of code. We need to add this code to our website to start collecting data.
From the moment we add the code, Google Analytics begins collecting information, which will be used to generate reports for us.
In summary, a data stream is a way to send data from our website to Google Analytics so that we can receive reports and gain insights about our website’s performance.
If you click on the Cog you can see enhanced measurements being automatically collected.
Enhanced measurement
Automatically measure interactions and content on your websites. Data from on-page elements like links and embedded videos.
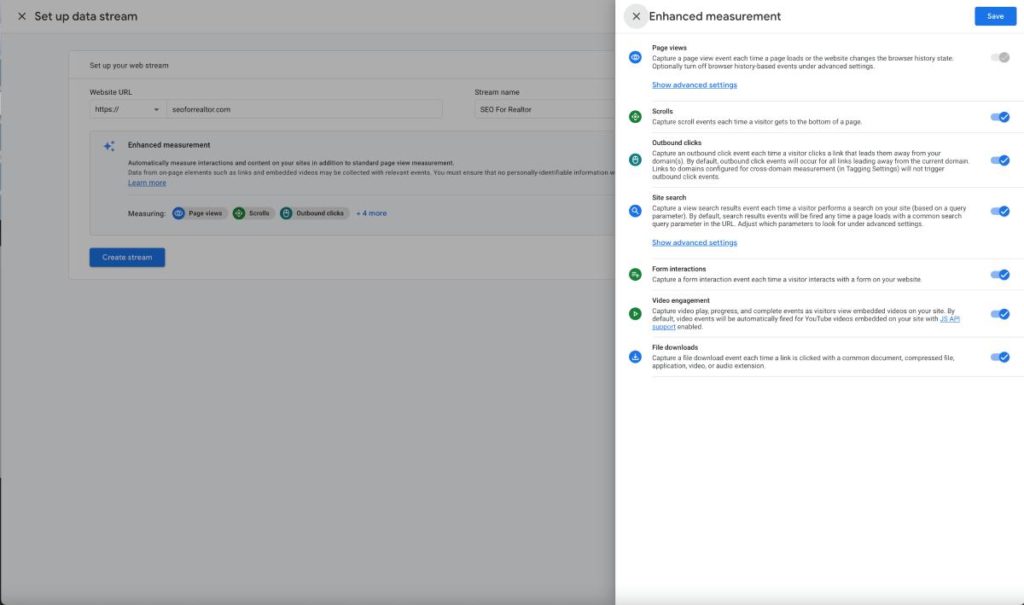
What we can capture as an event page views (as an event each time a page loads or the website) This one isn’t optional.
Scroll events each time a visitor gets to the bottom of a page, an outbound click event each time they click a link that leads them away from your domain(s).
View the search results event each time a visitor performs a search on your site (you need to have the search feature). Form interaction Video play, progress.
Out of the box this is super powerful. So click that create stream if you went to the cog first.
Two windows will slide open. All you need to do here is copy some code. and honestly we an come back and do that. So X out of this (X is beside instillation instructions).
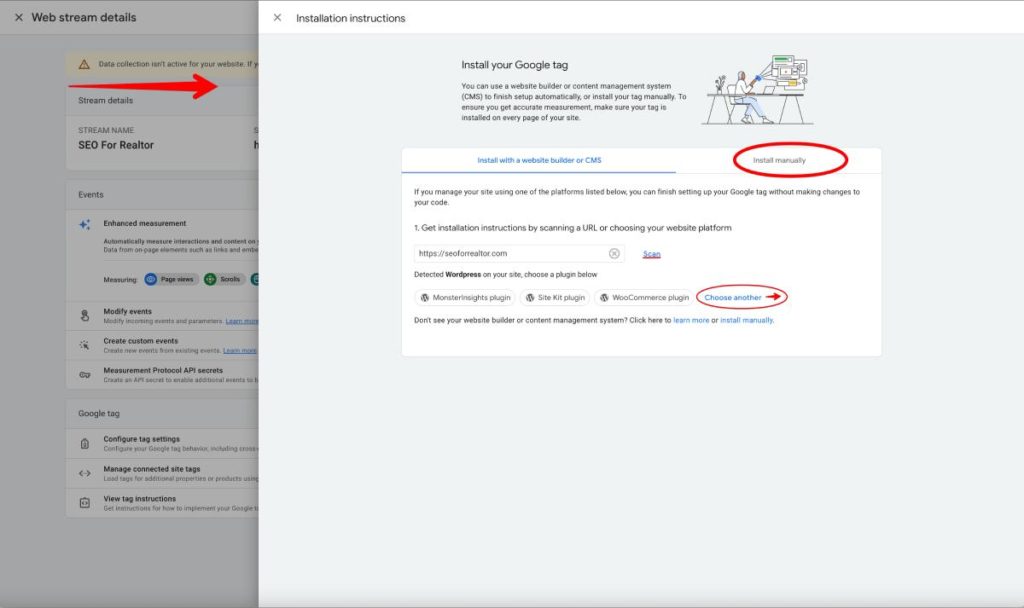
You can If you want to go grab the code hit install manually. You can also play around here scan your site with the scan button or choose anothe installation method. We’re going to do the manual version. Why? because this way we insure we know the exact process and know where thing are and what’s been done. Plus then we can get out of here and have the first part of the process complete.
Copy the GA4 Id tag – we need this because this is the id we will use in tagmanager to start connecting data. That being said we can easily get back here when we need the code.
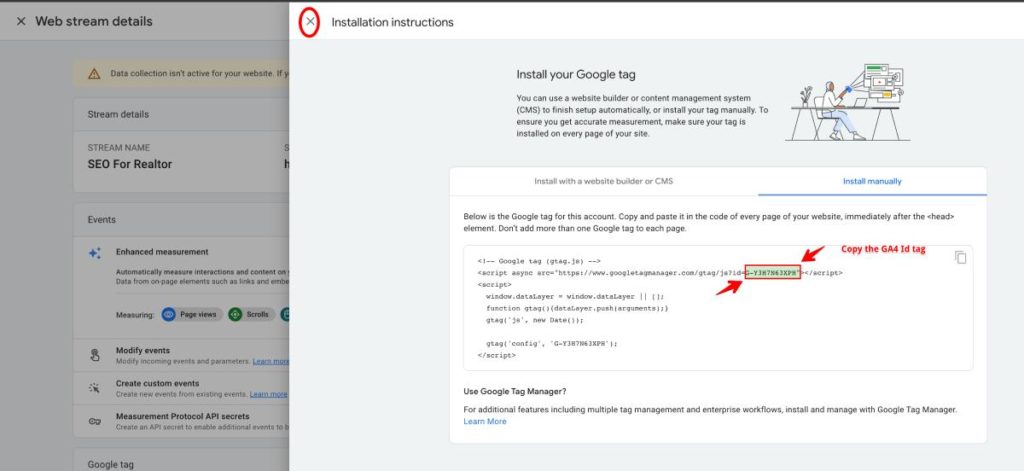
X out and then you’ll get a screen that says complete.
Property Options
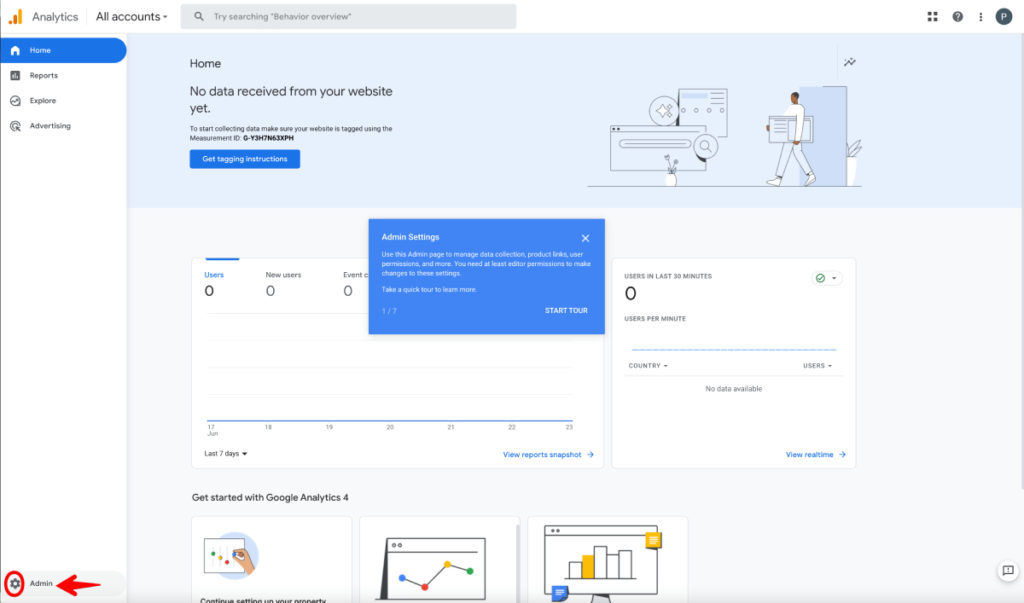
Start Here If You Already Have A Google Analytics Account. Login to Google Analytics (If you’re not already there). You’ll be taken to your home screen.
If you have multiple accounts, select the account you are looking for. You’ll see options in a drop down menu and there is a search bar.
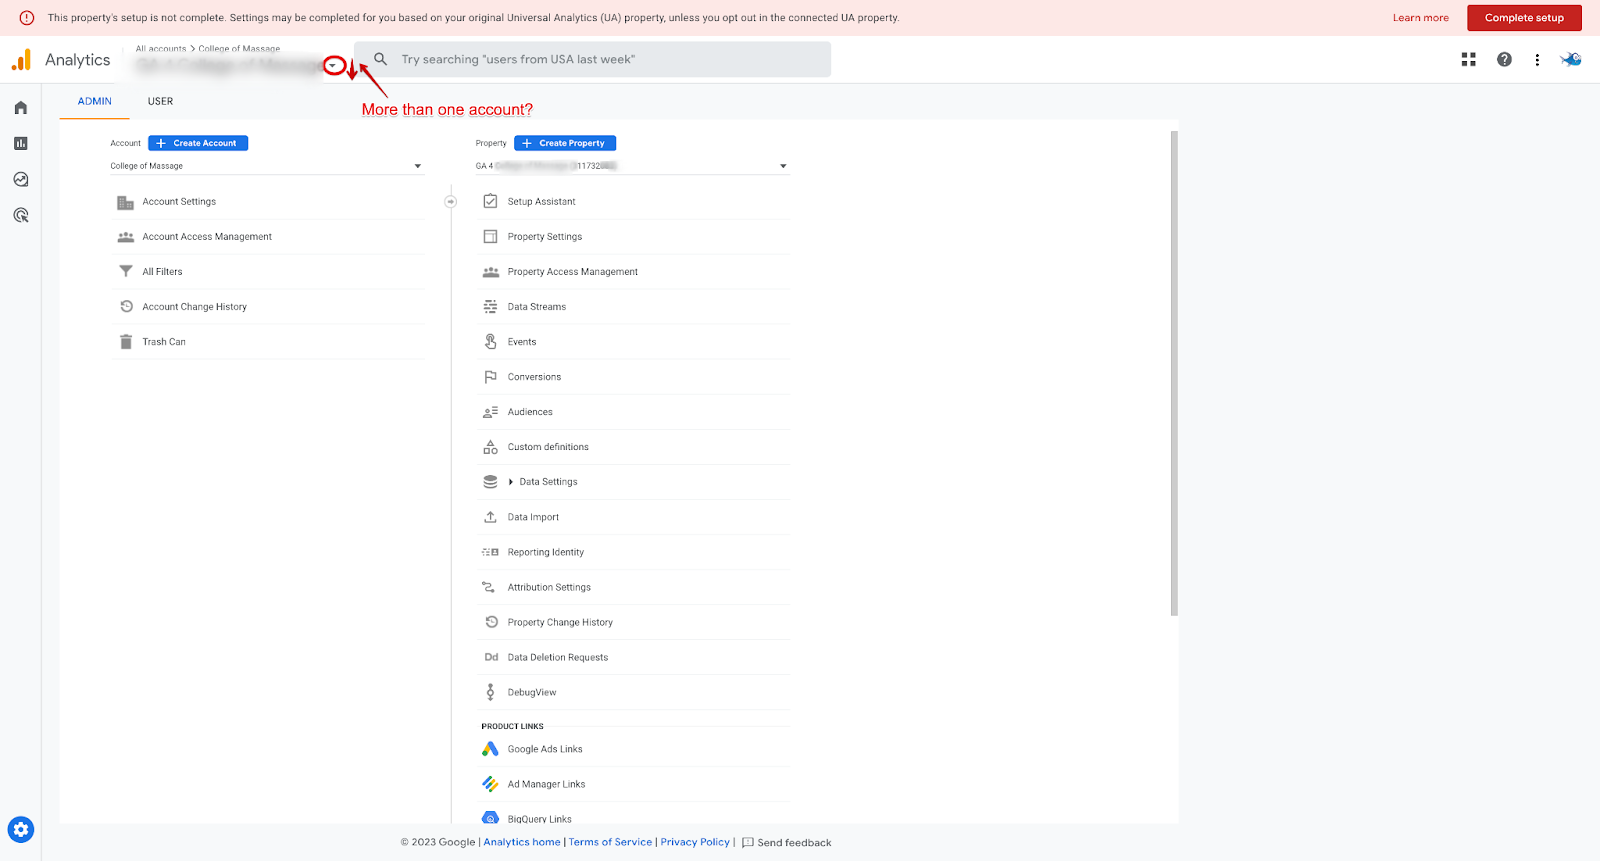
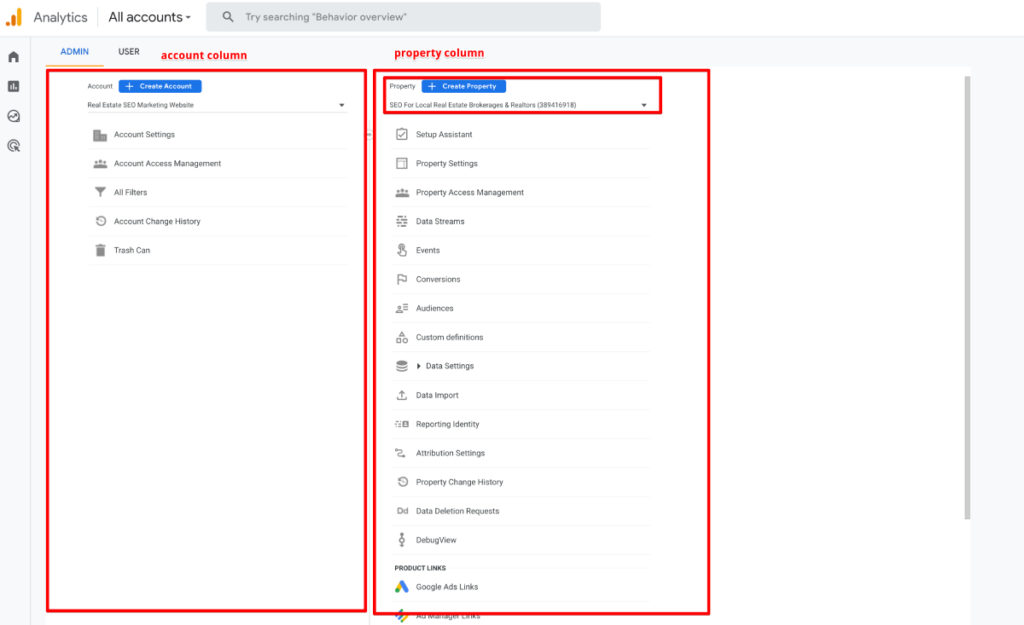
To set up GA4 (Google Analytics 4 property) in your Google Analytics account, click the cog in the bottom left to get to your admin settings.
You will only see 2 columns if logged into your GA4 set up Property.
You’ll likely only see two columns if you log into Google Analytics and you’re in your GA4 property. (the picture below could be slightly different from what you see) Click on you GA4 property.
Now click See your GA4 Property. Connection done!
Go to the vertical menu (column) to the left of the main window.
Right under Property Column, click the down arrow. If it has the UA before the number, you’re in Universal Analytics. You’re in the right place (the GA4 Property) if it has a number only.
Pick the property that doesn’t have a UA in front of it.

Second Step: Setup Signals
We’re going to setup signals. Now you can setup signals when you setup an account or when you go to the gamification stage of the setup. I do this step when I setup the account. But choose what works best for you.
This is a must step, a must do. Because it is what helps you gather data so when you create audieces you and then you can can market to those audiences. But you need a list of 1000 before you can do that.
It is easiest to set this up when you’re initially setting up your account. Or if you have already just connected everything you can do this when you’re doing the gamification migration.
What are signals in GA4
In simple terms, signals in GA4 are the information gathered from websites and/or apps. When you’re website visitors are logged into their Google account and have chosen to personalize the ads having signals on will allow the tracking to add them to the lists you have setup. Using Signals helps Google understand your users preferences and provides them with with more relevant advertisements so we definetly want this and because audiences will be super easy to make in GA4 we want to organize this so that we get the most out of our signals.
Data Settings, Collection & Retention
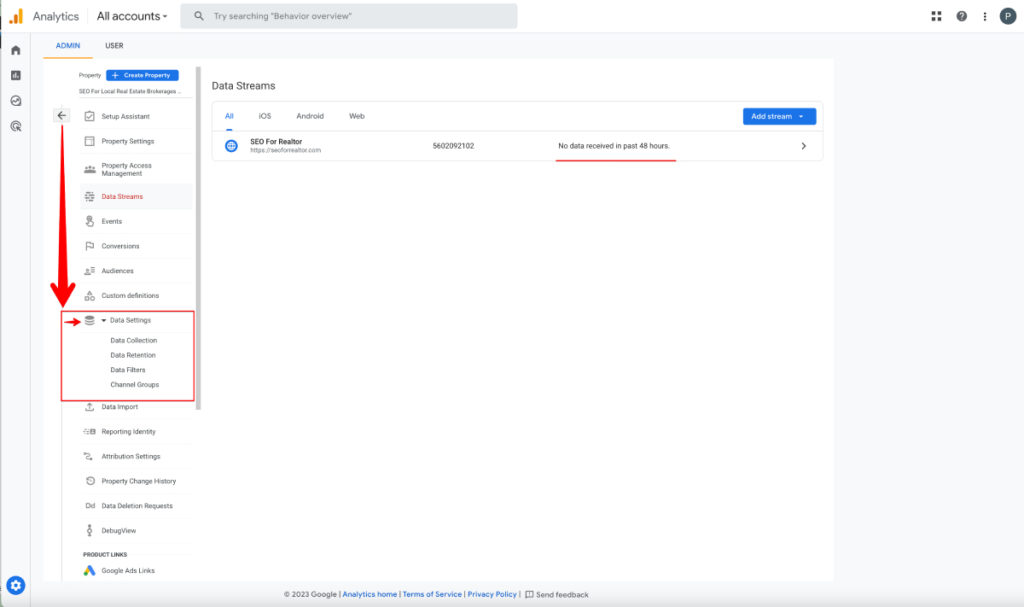
Data Settings
Now we head over to Data Collection. In the vertical menu, click “Data Settings.” Then select Data Collection. This will open up the data collection window to the right of the horizontal menu.
Click on the “Get Started blue button.

On the next page (the Activate Google Signals page) click on the “Continue” blue button.

Then click on Activate to activate the signals.
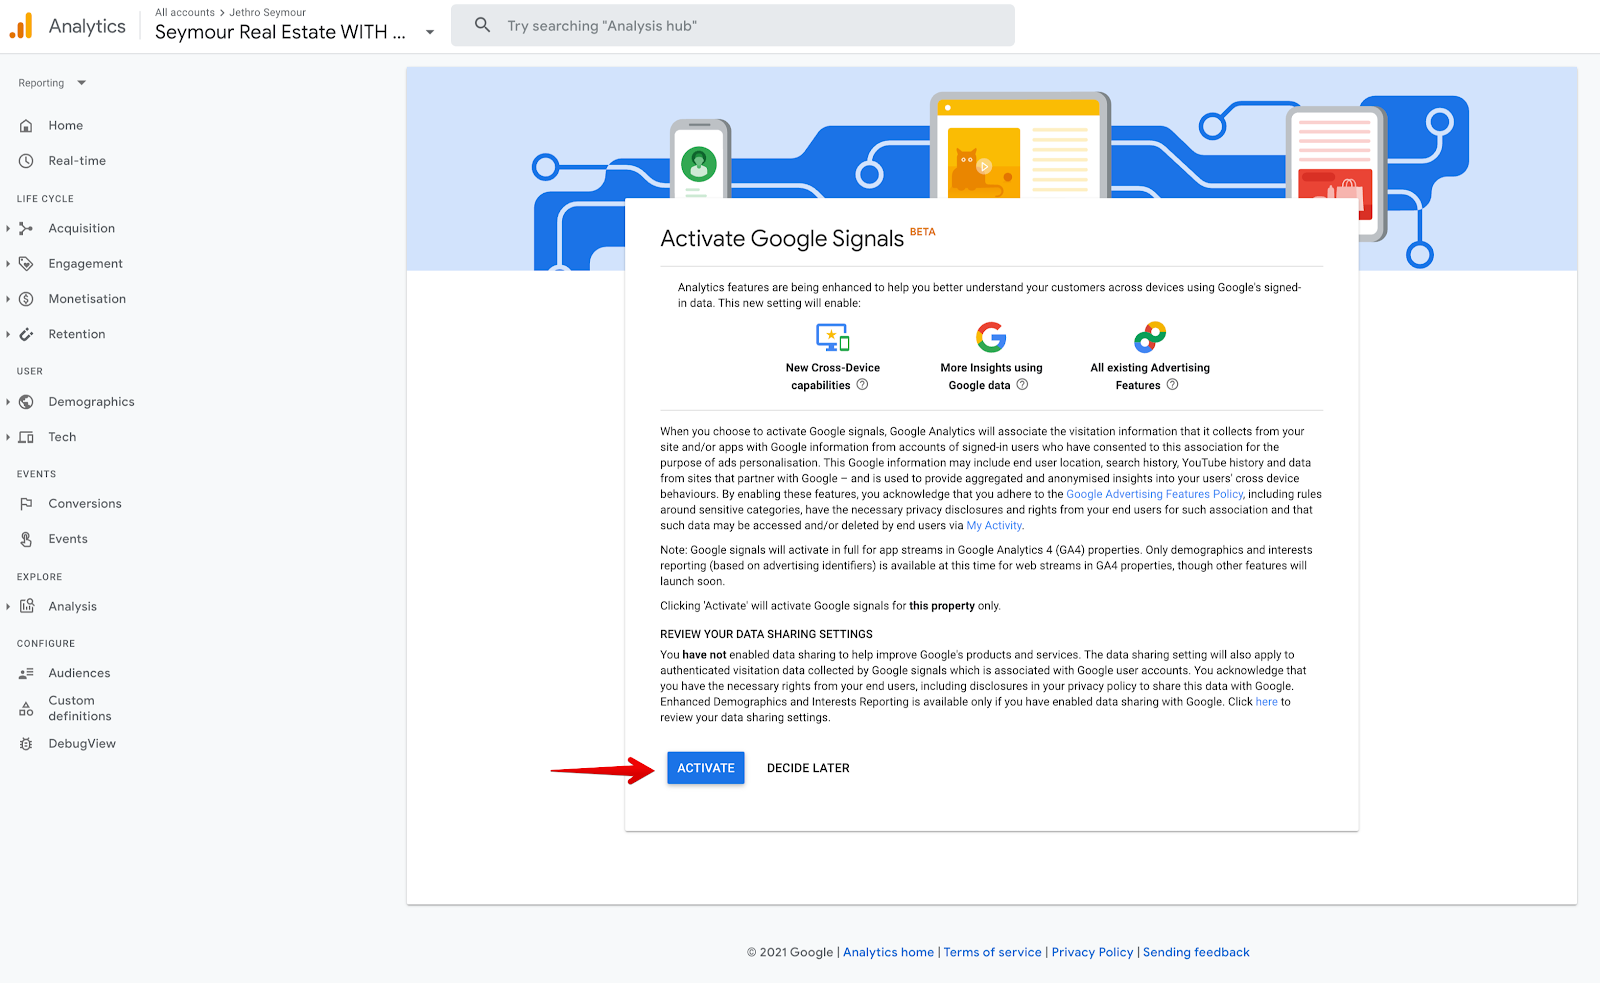
Your Data Signals have been created. See the small toggle at the top of the page.
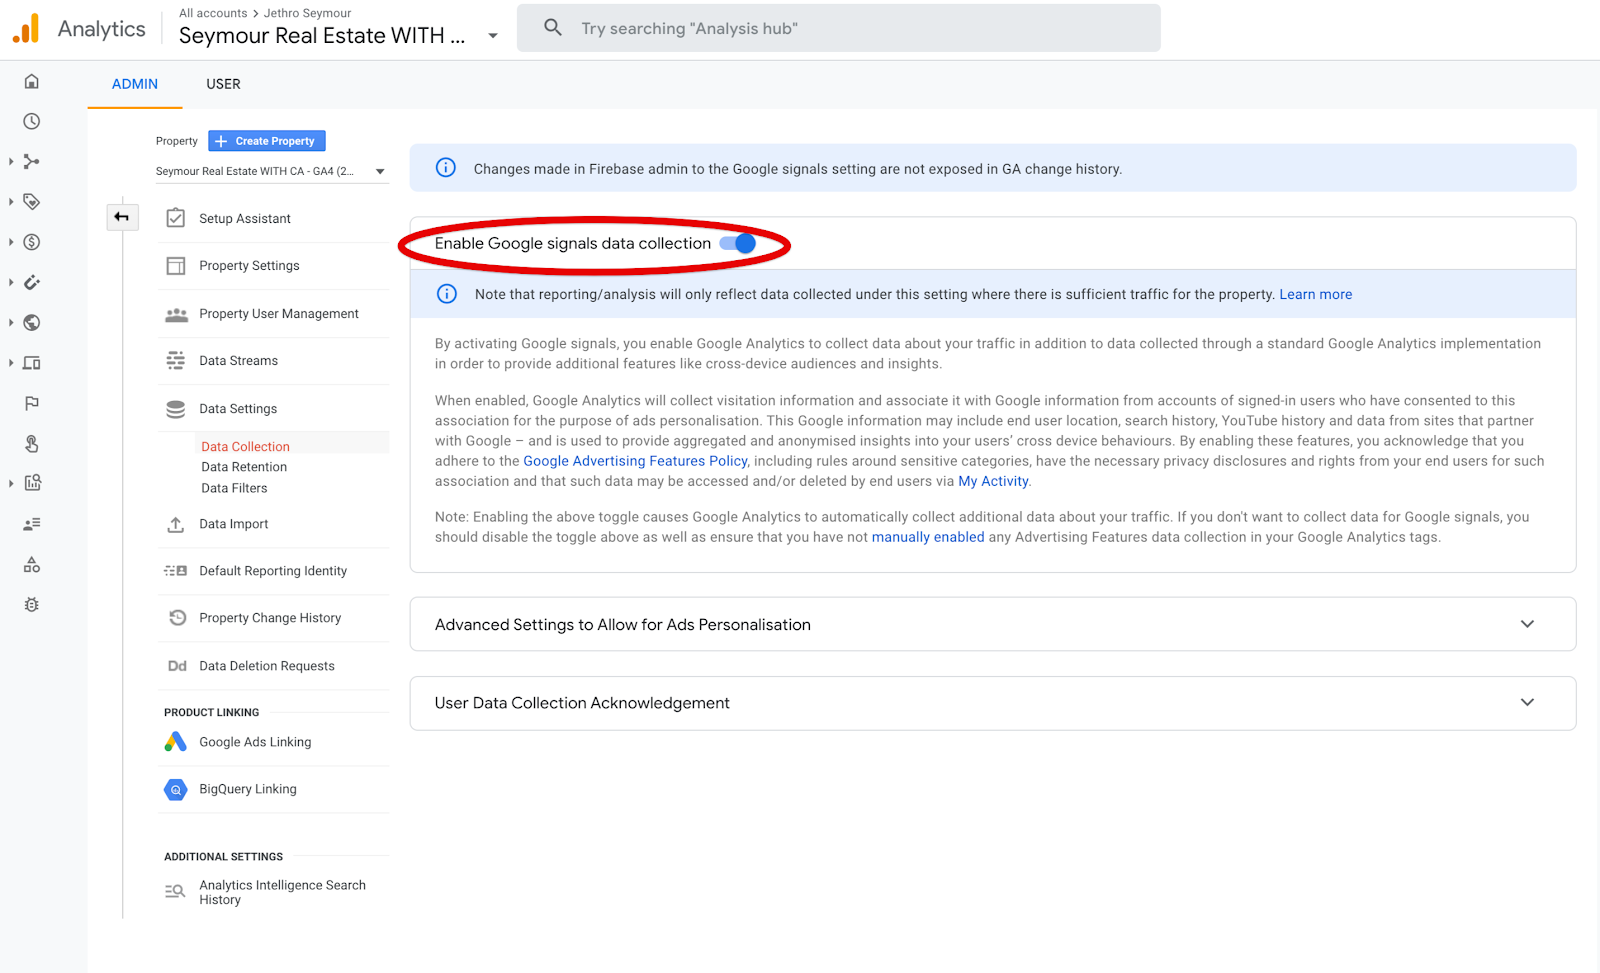
Data Collection
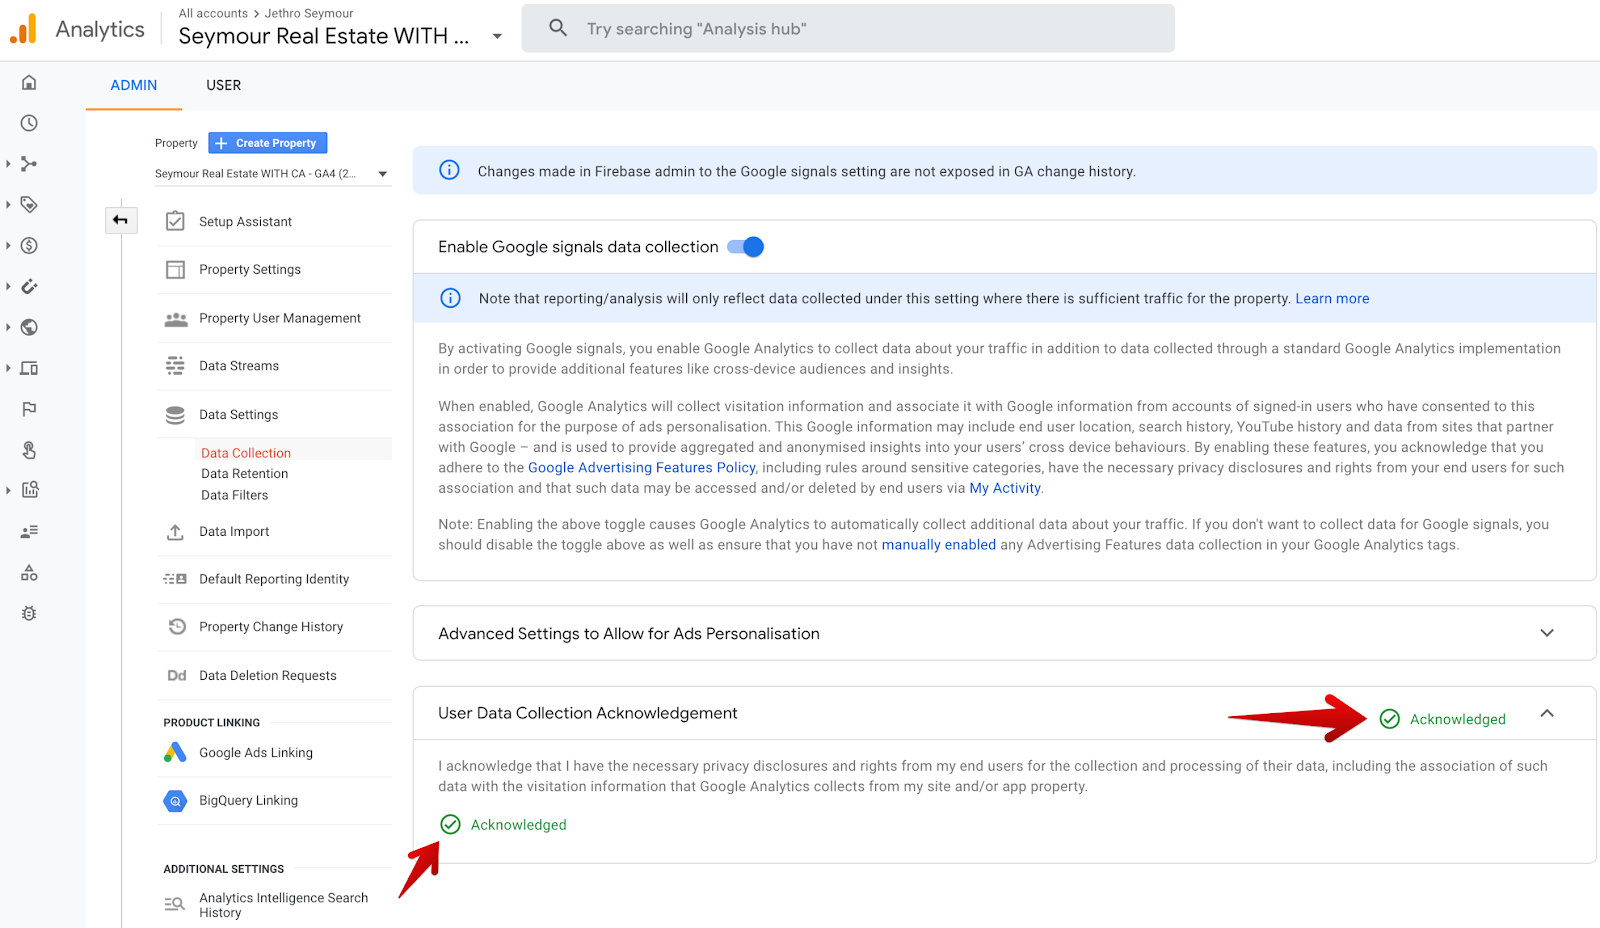
Google User Data Collection Acknowledgement In GA4 Set Up. On the data collection page, go to the 2nd box with the down arrow on the right. The box that says “User Data Collection Acknowledgement.”
The arrow will open a drop-down for the “User Data Collection Acknowledgement.”
Click on “I Acknowledge.”
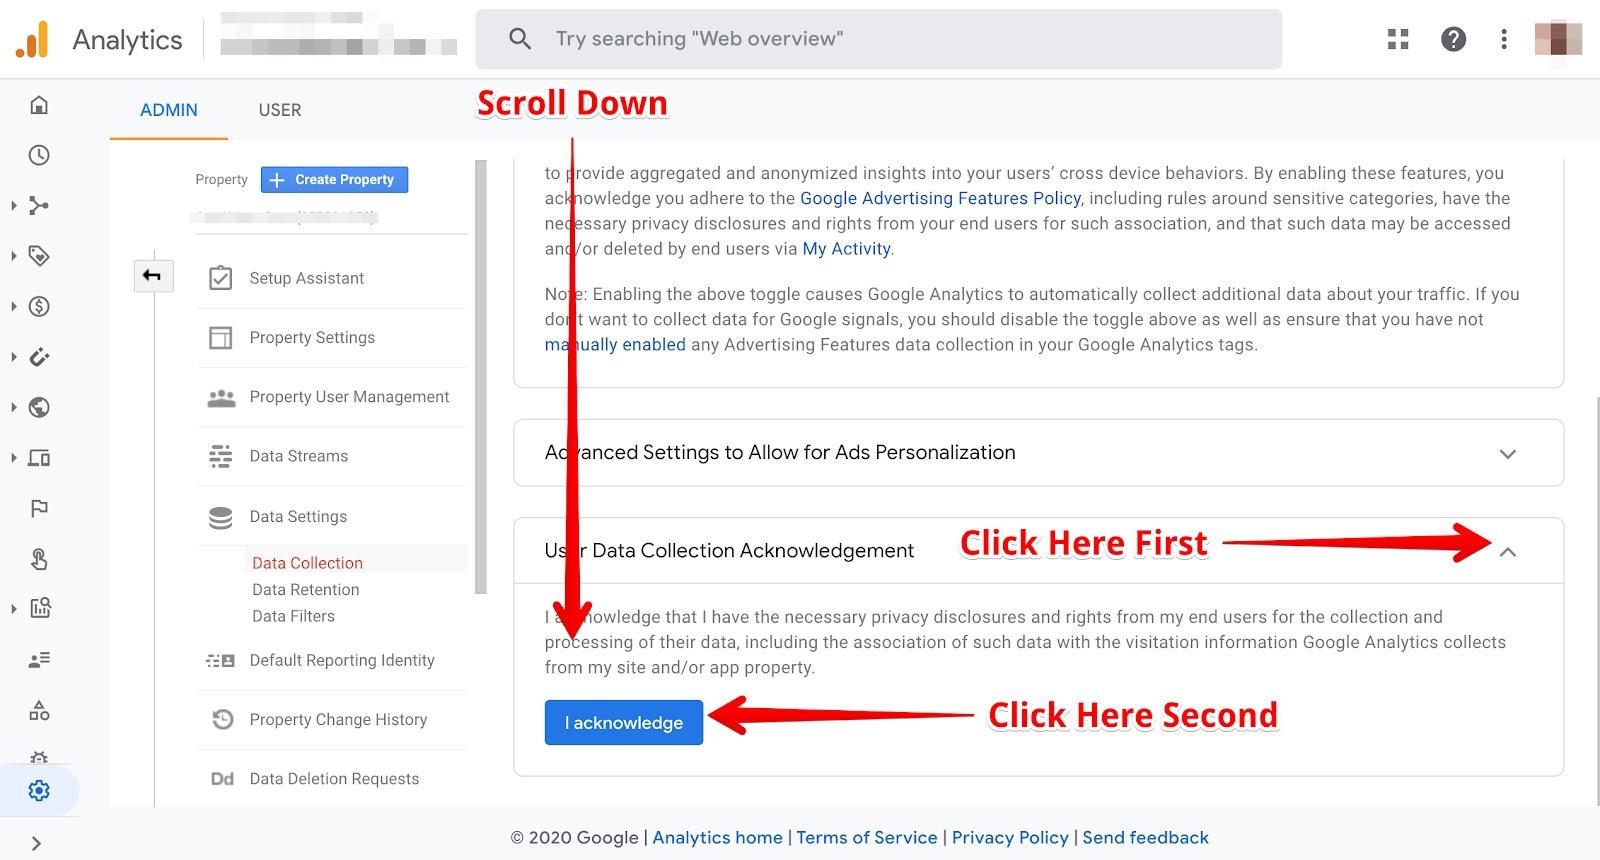
You’ll get a green text that says ‘acknowledged‘ after you click the I acknowledge button It is tiny text, but if you’re paying attention, you’ll see it.
Now go back to the GA4 property Data Collection and click on Data Retention from the drop-down menu. Change the Event Data Retention from 2 to 14 months and click “Save.”
Data Retention

Now we’re mostly done configuring the first parts of GA4.
You can stop here, have a break or get your measurement ID and save it to add to Tag Manager when you are ready to connect Tag Manager and Google Analytics 4.
Our next step will be to get your measurement ID from GA4 set up and go to Tag Manager.
Breaks are good. Bookmark the page and come on back when you’re ready.
Third Step: Data Stream Setup
In this step we are going to be using Google Analytics and Tag Manager.
In the Data Stream and click on greater than arrow and copy measurement ID at the top right of the page.

Measurement ID
If you’re still going or coming back, copy the measurement Id from the Data Stream page and save it in your text editor or somewhere.
Or just come back to the Data Stream section in GA4 when you are ready to insert the code in Tag Manager.

Now Go to Tag Manager. You are ready to connect Tag Manager and GA4. If you are taking this step, you need a Google Tag
Now Go to Tag Manager. If you do not have an account, you’ll need to set up an account.
Fourth Step: Connecting Tag Manager To GA4
What you need access to
Create New GA4 Tag
Sign into your Google Tag Manager account, and select the container for the website where you want to add Google Analytics 4 tag. Once you have signed in, you will be on the Overview Page. Click Add a new tag or New Tag in the center or click on Tags on the left menu.

If you click on Tags, click on New in the Top Right Corner

On the new menu, click on Tag Configuration.
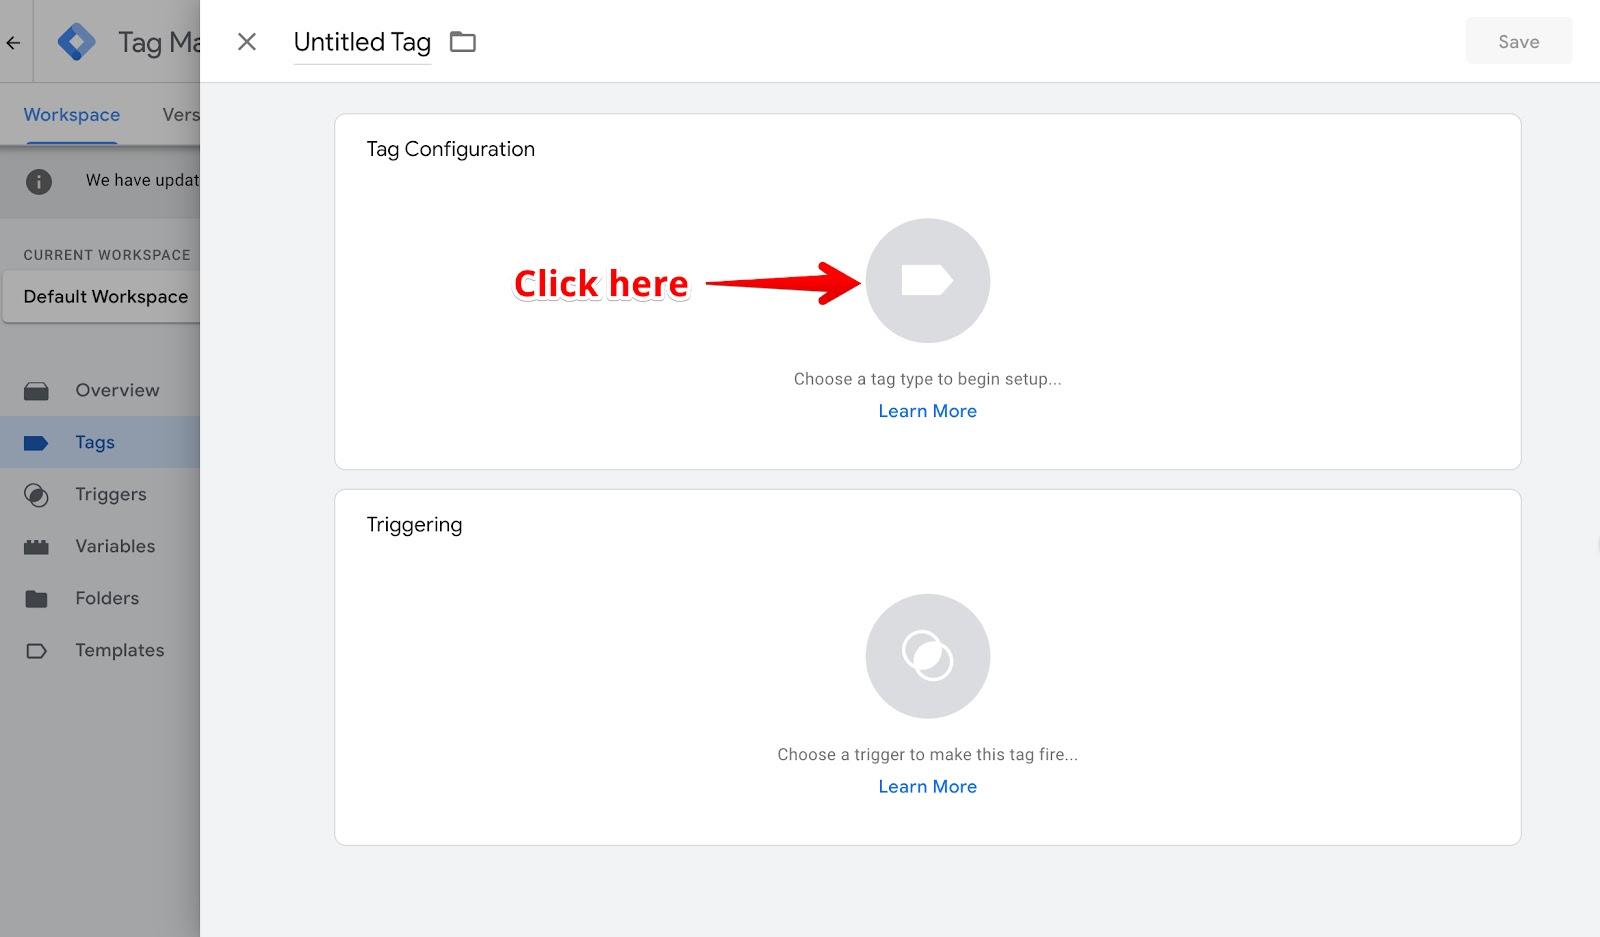
On the new menu, select Google Analytics GA4 Configuration.

Now we need the Google Analytics 4 Measurement ID.

Find The GA4 Measurement ID
Go to Google Analytics. Click on Admin in the bottom left corner

On the Data Streams menu at open click on the arrow at the right side of the website name.

On the Web Stream Details page, click on the copy icon on the right side of your Measurement ID.

Add GA4 Measurement ID & Publish The New Tag
Take the freshly copied GA4 Measurement ID and paste the Measurement ID in the spot on the Tag Manager Tag.

Go to the Triggering Section and click on the section.

Select the All Pages Trigger since it is the GA4 Analytics Tags.

Now click on Save.

Click on Save again since the name isn’t perfect it is unnamed.

Click Submit.
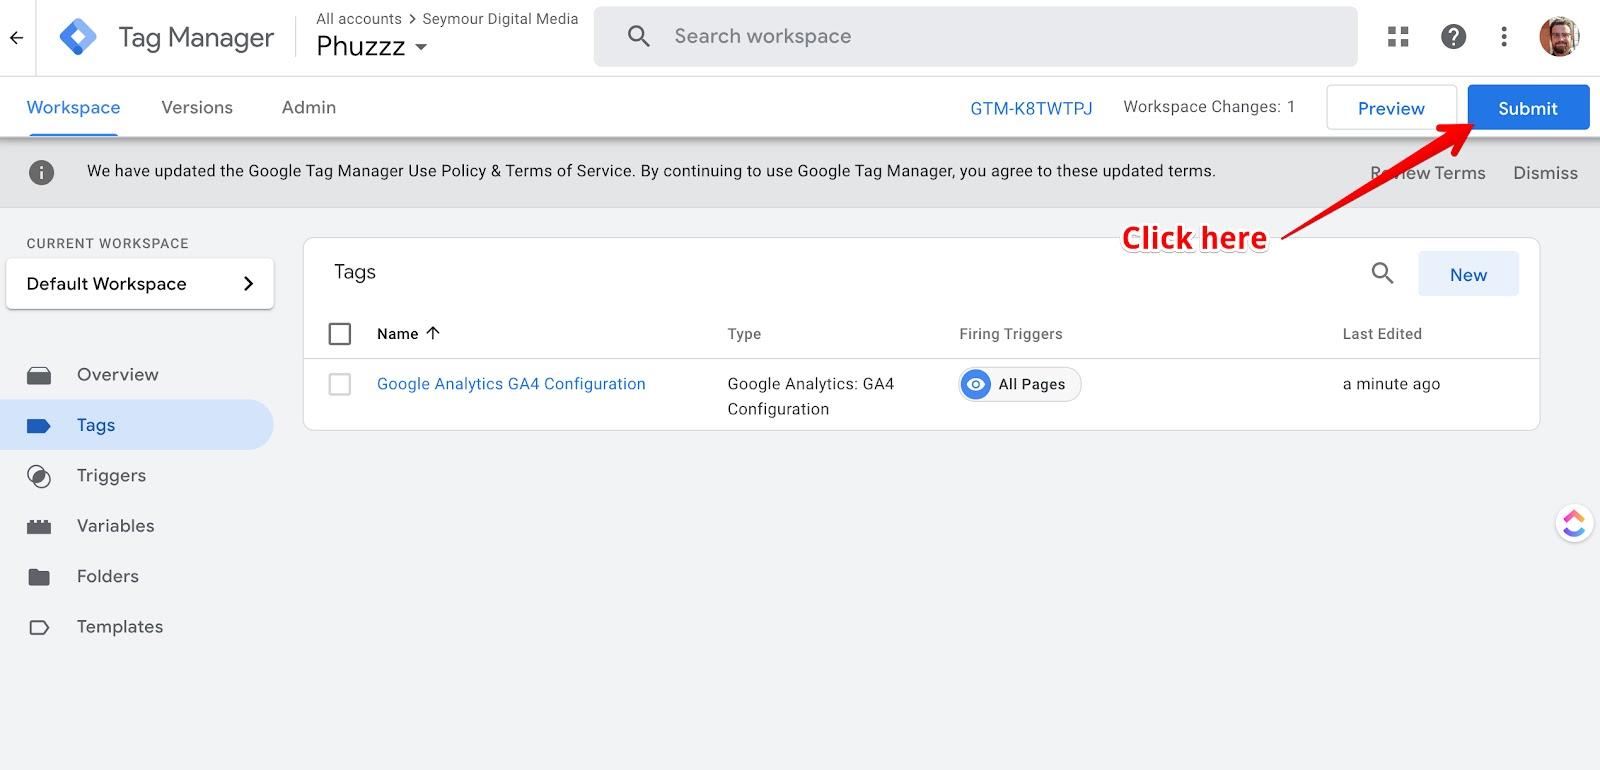
Add the name Added GA4 Tag for the Version Name and then click Publish! You Are Done. You have GA4 set up (Google Analytics 4). Now You Can Collect Data. Give Yourself A Massive Pat On The Back
Now if you have any questions, don’t hesitate to reach out and contact us.
Fifth Step: Setup Assistant & GA4 Gamification
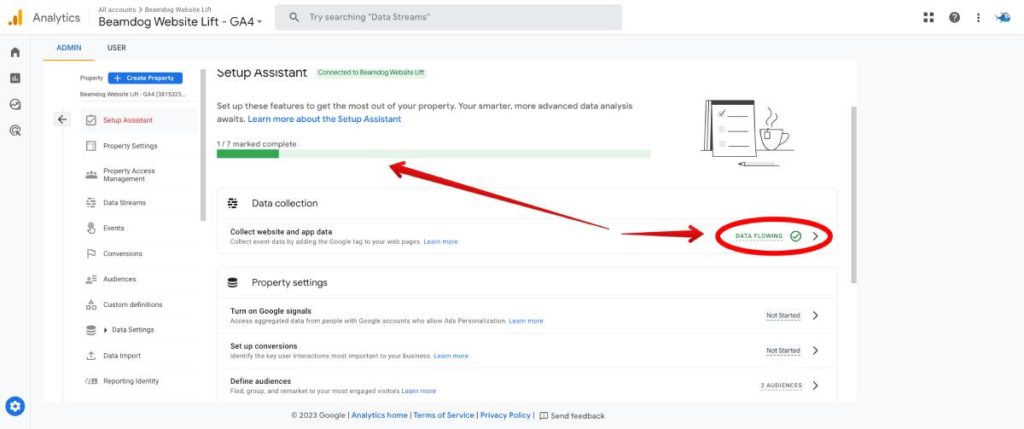
So Google is pushing us, and they’ve gamified the setup assistant. It makes it fun. Now that you have data flowing and you’ve had it flowing for a while.
Everything is connected & everything is flowing let’s go back to Google Analytics get the rest of this done! and mark things off as complete. We will go down the list in the middle of the screen. You can find all the settings in the column to the left of the main screen.
You know how to get there. Go to Google Analyics. Sign in. Hit the cog to get to the settings. Click on your GA4 property and click on Setup Assistant in your property column.
Data Collection
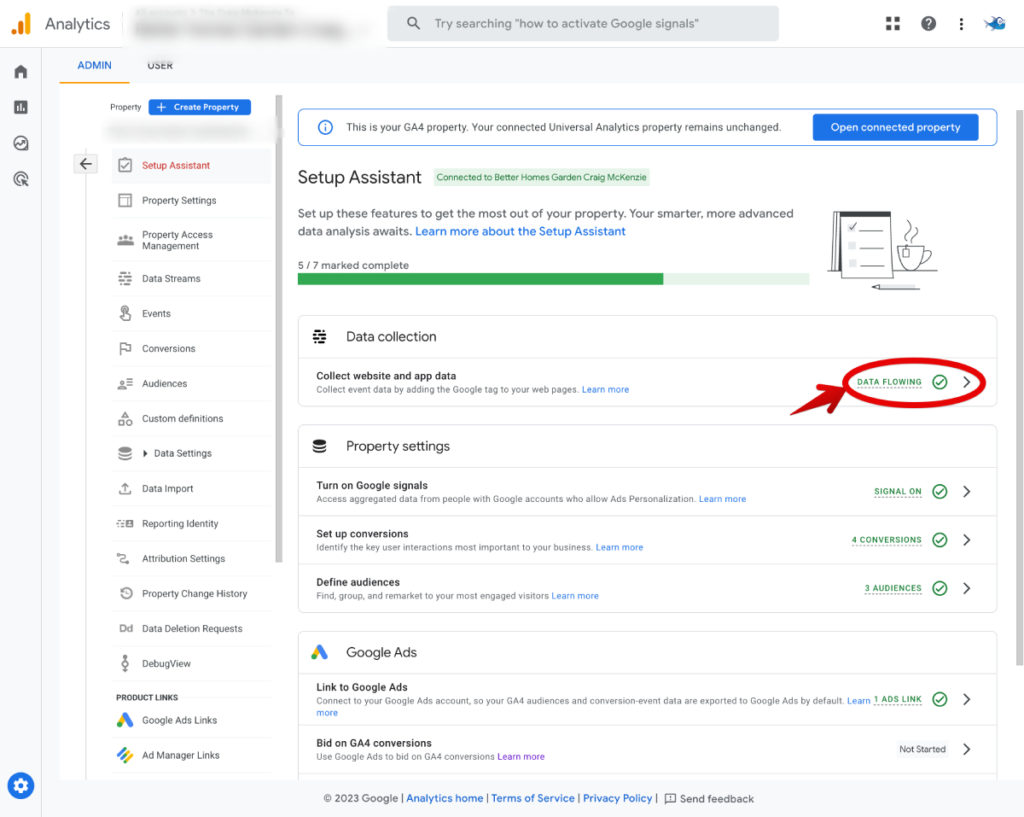
Mark Data collection as complete (because we’ve done it – see above). Now make sure you’re collecting data first.
Mark Data collection as complete (because we’ve done it – see above). Now make sure you’re collecting data first.
How? It will say data is flowing. Click into your “manage data streams” if you want to see more. We’re going to click compltee.

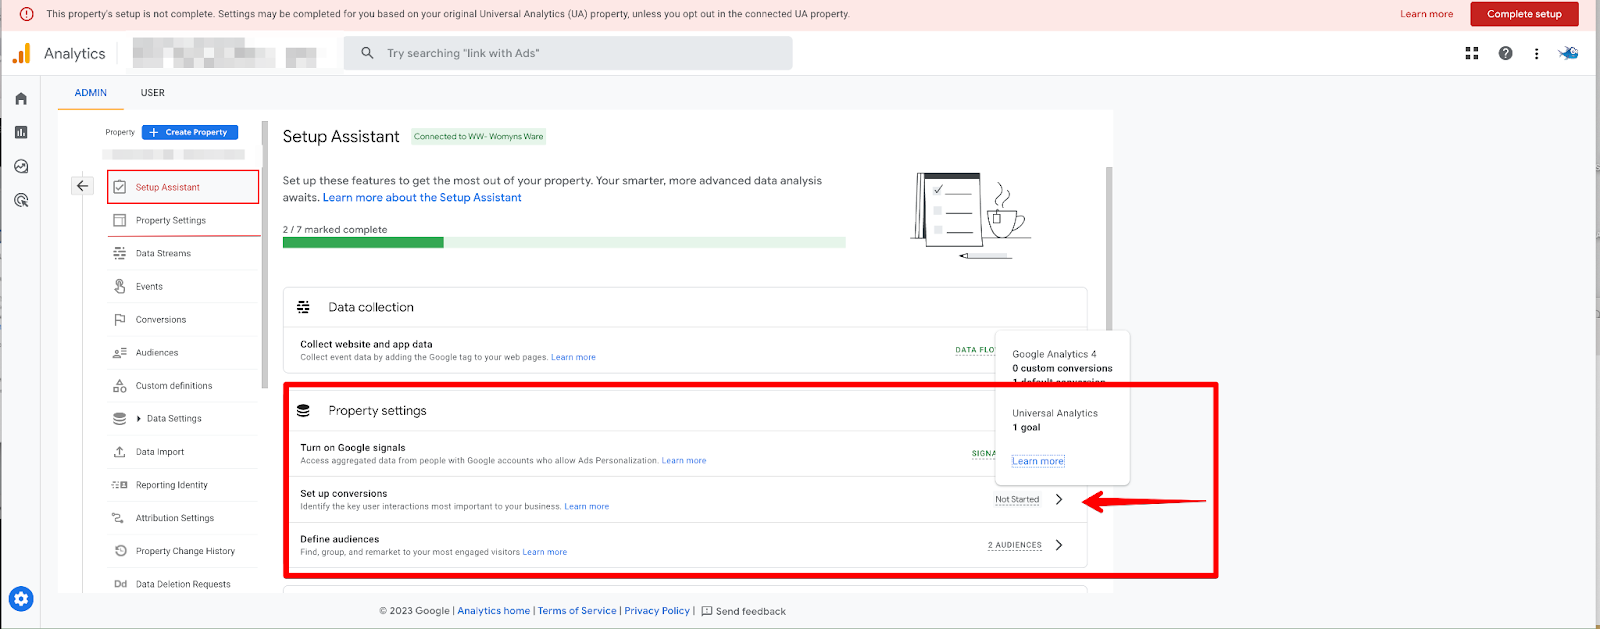
Property Settings
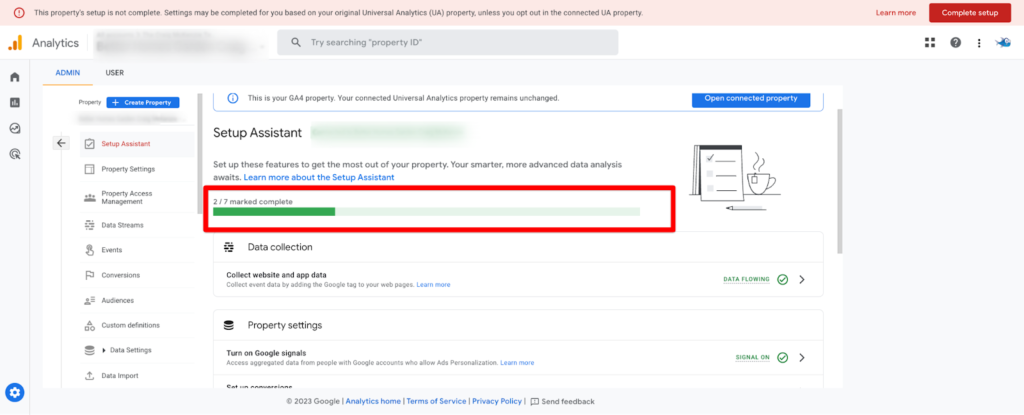
Data is flowing, and Signals are on. We turned them on above in step 2. If you haven’t seen that you do the same thing as above but for property settings. We have 2 out of 7 done or complete.
Events And Conversions
Events and importing Goals as conversions in Google Analytics 4. Are you ready?GA4 measures events as specific actions or activities on your website or app. This is different from Universal Analytics. An event can be a purchase or a form filled out, or something else.
Some events are configured automatically (we’ll want to turn some off), and others are not.
Remember enhanced measurement recommendations? (see above) in data collection?
Two Other Events To Note
- Recommended events – these are predefined, but you choose to implement them. Not all may work for you.
- Custom events you define yourself. You select names and parameters, and you can collect specific data specific to your business. Google Analytics does not set these up.
Events as Conversions
Are you ready? Things may get confusing because they can be confusing. I’ll work hard on making it simple for us all.
We can and will mark certain events as conversions (similar to Goals in Universal GA).
You had goals in UA (Universal Analytics), measuring how often people complete specific activities. We can take events and pull them in as conversion. These will be called conversion events. Yup, remember I said it was confusing. Over time it will make more sense.
What Is The Difference Between Events & Events As Conversions
GA4 events are triggered as users interact with your site or app. It could be anything, a scroll, a click, a form filled out. Using GA4 set up event conversions allows us to flag any events that contribute to the success of your business as conversions (for example, a lead or a phone call). Whenever these flagged events are triggered, a conversion is registered in your GA4 property if you set up the Conversion Events (Usinging Tag Manager & GA4).
Why Do We Want To Track Conversion Events?
Reporting on conversion events lets us track/measure events that are important to us. And tracking these specific events can help us measure return on investment with ads campaigns, and you can also bid on these conversions.
All you need to know or get your head around is that Goals in UA are conversion events in GA4 and configured in GA4 with the help of Tag Manager.
I know it is a lot, but between Google migration series(Migration Series Day 3: Events and conversions in Google Analytics 4) and what we are doing here, we got this.
We are going to mark our target events as conversions.
To recap quickly. Events are measured in GA4 set up. We turn our most important events into conversion events.
Migrating Goals Into Conversion Events
You can make conversion events (which we will do), or and you can migrate over events from Universal Analytics which we will do.
Signing Into Google Analytics (GA)
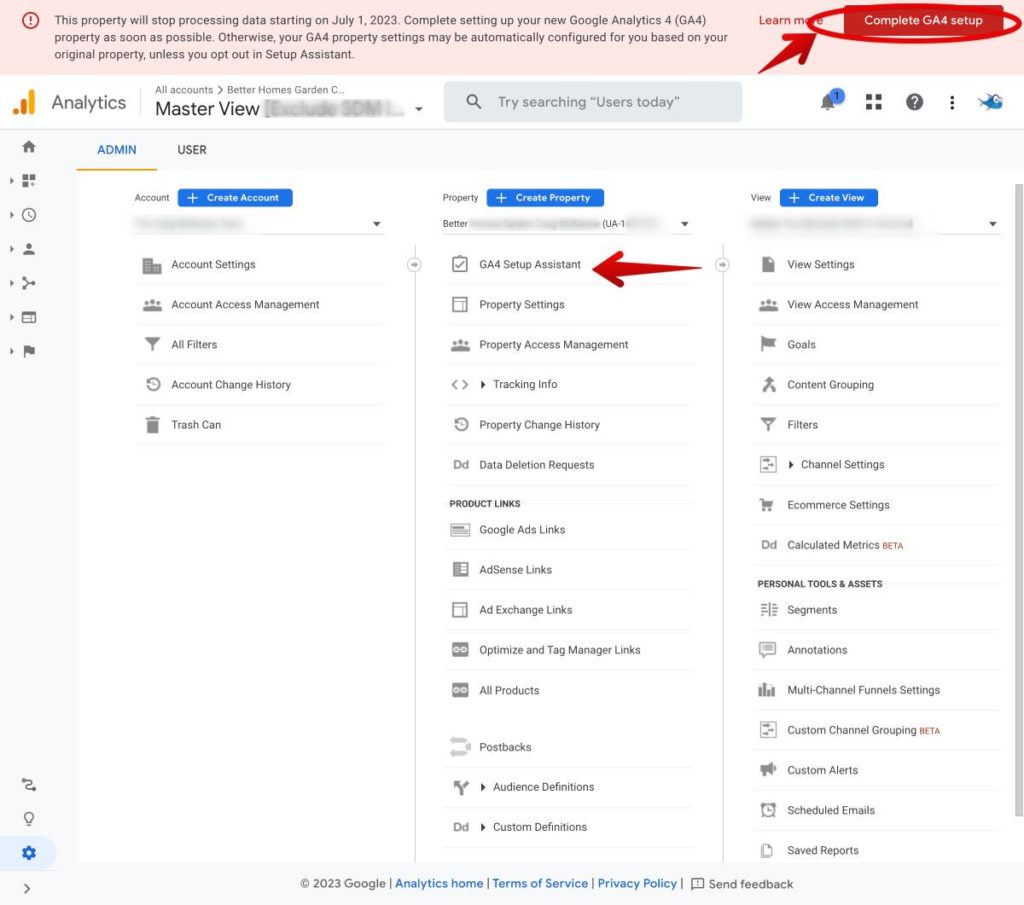
You may get an image like this or a big countdown timer. It is stressful and annoying. Ignore it. You are seeing this because you are in Universal analytics. Hit skip. If you click on the No radio button you’ll go deeper into what you don’t need. Click Skip for now.

If you get the pop up just click skip. Where to go – Cog bottom, left-hand side.
Admin > setup assistant.
Now things may look different to you. We will try to cover each scenario. So, don’t get stressed if the pictures, screens/videos differ from what you see. Just click around.
Things are moving quickly in GA4 set up, so things move around. This is also a great way to get used to the new software. And, of course, if you need help, just ask.

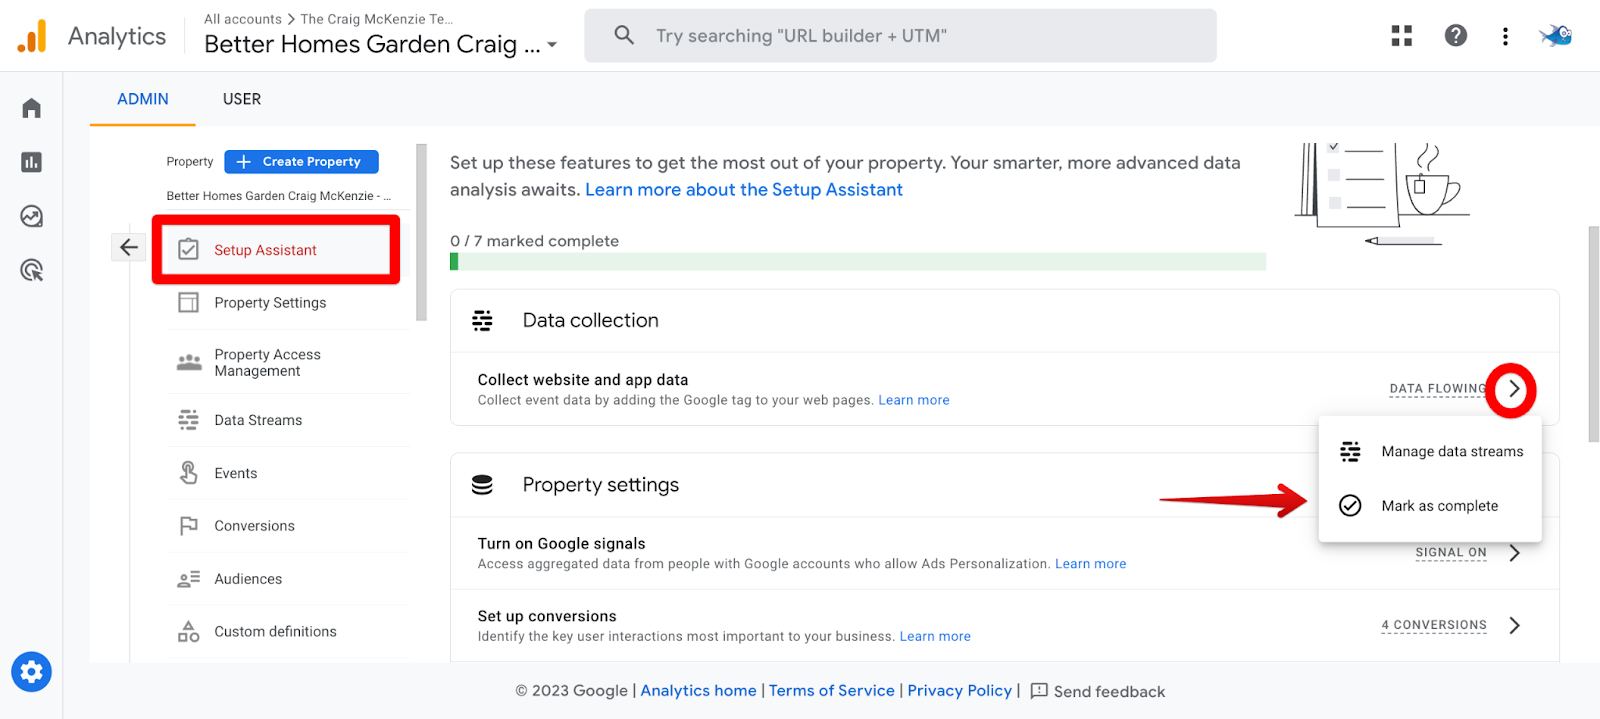
Once you click on that setup assistant, a new window will slide open from right to left. Go to Data Collection You can get to it in the middle of the screen or down the left-hand side column. Mark off as complete.
Setup Assistant – Data Streams
Setup Assistant – Property Settings
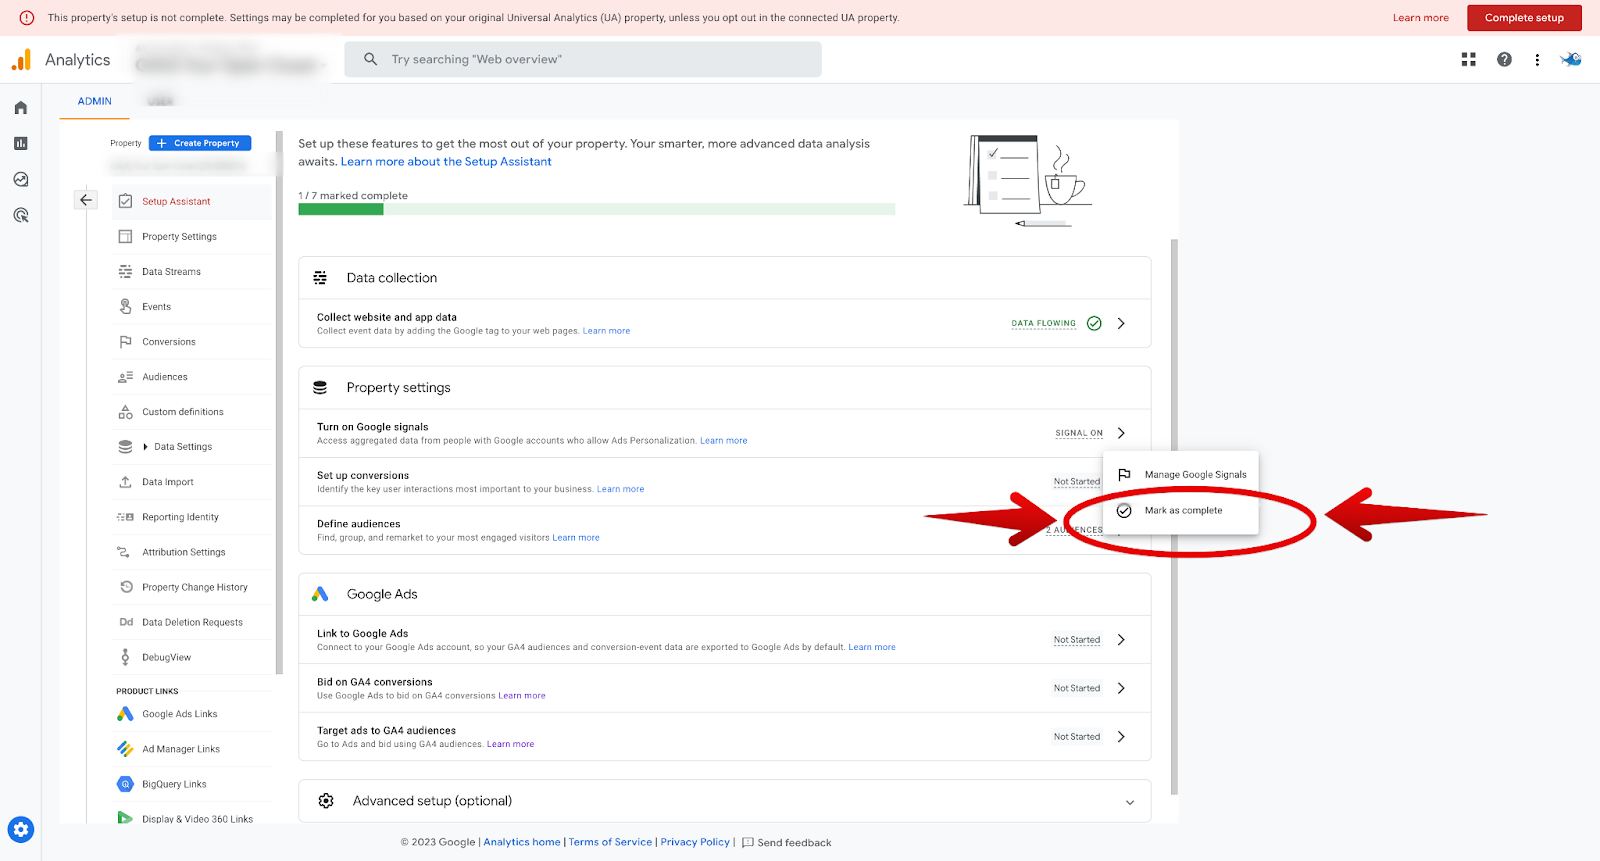
Turn on signals! we did it above! now we’re just checking it off
A popup will appear above if you hover over the “Not started” text. You can see the turn on Google signals. Once turned on the pop up menu will say GA4 signals turned on GA signals turned off.

Mark it as complete using the drop down menu and watch that gamification bar.
Set Up Conversions – Property Settings
We are setting up the conversion configuration, not the actual event data from the website.
That is entirely different and done by Tag Manager. That is a mouth full, and getting my head around was hard for me. Just know the steps you do in GA4 set up are only half. We must go to the Tag Manager to check/complete the setup. I mentioned this but don’t worry about this right now. We will get to that.
We’re going to go through the 3 options. You might only have 2 options.

Import Goals From Universal Analytics Google
Import goals from Universal Analytics Google are what we’re doing first. You will only get this option if Google Analytics setup assistant is able to copy your UA goals into GA4 as conversion events.
This can save you time in recreating your property goals, You will still need to set this up in Tag Manager. We will have a video for you below.
Import Existing Goals From Your Connected Property
You’ll do this if you already have goals set up in universal analytics. This can be easy, so let’s give it a go.
Click on the import from Universal Analytics

A window will slide open from right to left. Showing you your options. Review them and hit the import button, Top right.

You might get an error message. What is this all about?
If you click on the learn, Google will give you options, manual options, and more. It needs to be clarified. Really from my understanding, you don’t have to worry.
What you’re doing when you click on the “continue anyway” is telling Google you will let them configure it because it has not been fully configured/connected yet. It will all easily work out, I believe.
Bam! It takes you back to the setup assistant, and if you click back into the conversions, you’ll see faded-out check marks, meaning you’ve done it and can’t do it again.
We imported the Goals into conversions. They have been imported as conversion events. Let’s go see it.
Now we can go to the conversions tab to see. Initially, I went to the events tab and clicked off the email sign-up, which entirely disappeared. So if you make a mistake like that, you’ll just have to create a conversion event. Not the end of the world, but maybe don’t do that and make your life easier.
Below are the completed goals brought to conversion events.

You can see if you compare 4 were migrated over, and below there are 6. Two booking calendar events (weird but okay), the purchase event (which is not optional). And the signup to the newsletter needs to be there because I made it disappear by going to the events section and turning the toggle off.

So Goals were imported, and now we can see them as conversion events in the conversion section.
We will toggle off the file download as a conversion event because we don’t want to measure that as a conversion. This is a personal choice. You will choose what is best for you. We can make that an audience and retarget to a list that way.
Troubleshooting
I disabled the option by toggling it off, and then it disappeared. We also toggled off the 2nd calendar event because we doubled up doing the migration. You, of course, may see something different. But you may also have to troubleshoot. If you have questions, join our Facebook Group and ask us.
Now that you are ready to accept conversion events, of course, that is once you’ve confirmed the GA4 conversion tracking setup in Tag Manager. We have to make sure we’re collecting data in Tag Manager.
Manage Conversion
Back To The Setup Assistant. We Are Just Checking Things Off.
Go To Property Column>Setup Assistant>Property Settings>Manage Conversions. Manage Conversions Is Where You Go To View And Edit Conversions.

Migration Check
Now you need to go to Tag Manager and Universal Analytics (to ensure /check) that the event tracking for Ga4 has been set up correctly. In our example, we have two conversions for the Calendly booking, so something needs to be fixed, and we had to troubleshoot what happened. We could figure out what was going wrong by going to the two places above.
What happened? We imported one, but there was already one created. We troubleshooted what the issue was. Because the event tracking in Tag Manager was already in for GA4 set up, we doubled up. To fix it we turned off the wrong conversion in GA4, and it disappeared

You might not have the event tracking in tag manager setup. If this is the case there will be a video below (but that will show up in a day or two) showing you how to do this.
Tags already set up in Tag Manager or not Google is saying it is important to mark this off as complete so Google Analytic.
In the future, when we set up this stuff, we will always set up our events in Tag Manager, and they get transferred over to GA4 set up.
You can mark this off as complete if you have checked or know it hasn’t been checked off. We will finish this off but not this second.
Step 6 Audience
Audiences. So you can learn about your users and improve ad campaign targeting. This is where things will get interesting because we will have an easier time creating audiences.
We won’t spend much time here. It is pretty Easy. Follow this video:
To get into depth, watch this Audience Builder in Google Analytics 4. We will set up an audience and well fish off linking Google ads and set up the tracking
Let’s mark this off as complete.
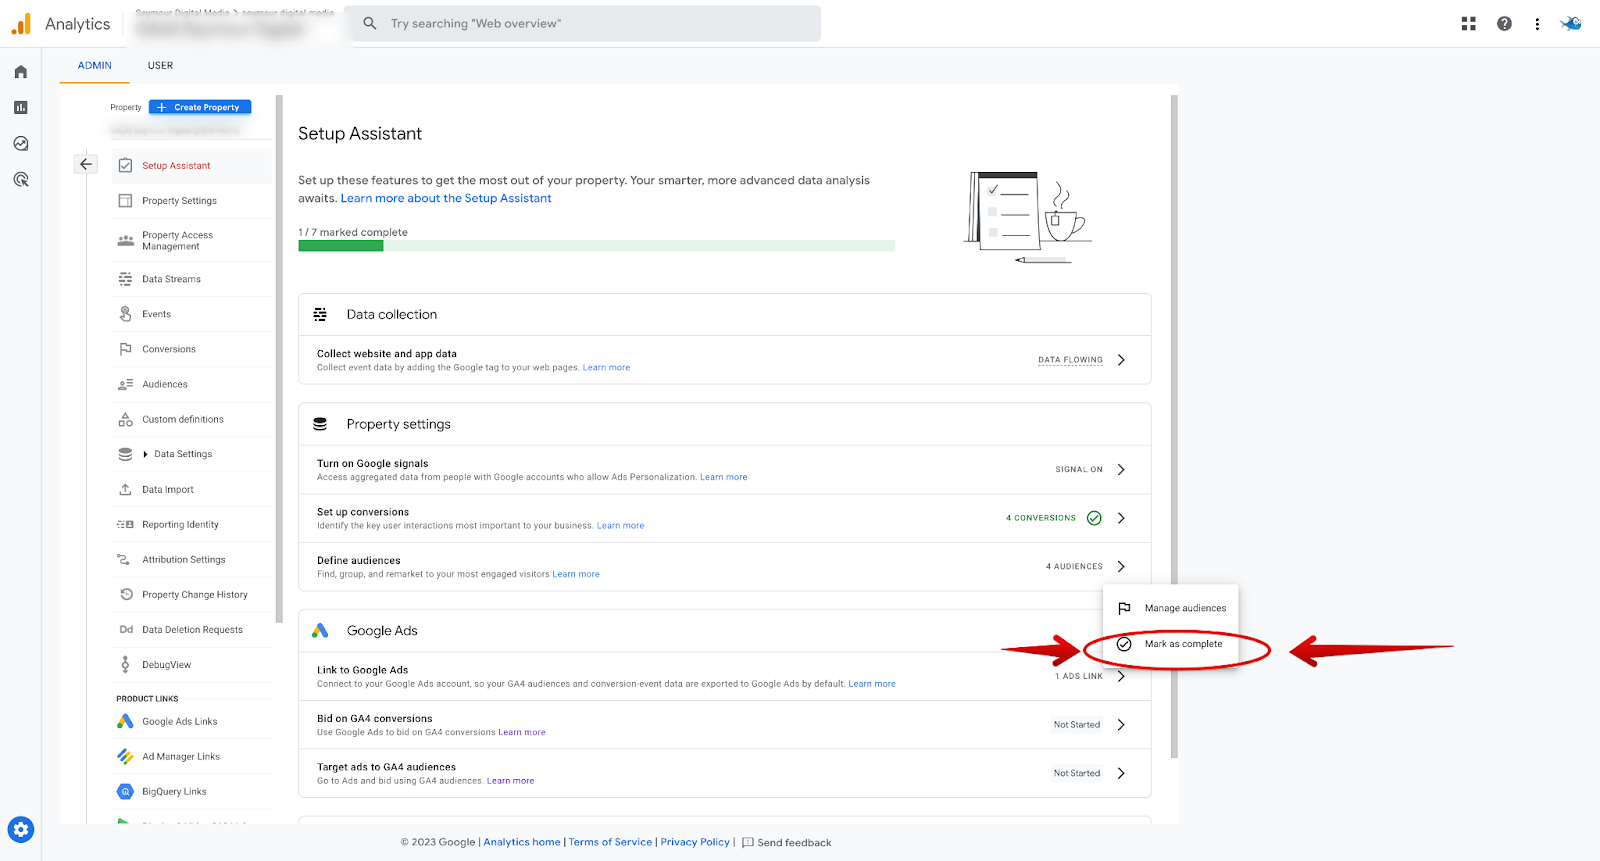
Step 7: Google Ads Linking
If you use Google Ads for your business linking your Google Analytics 4 property to your Google Ads is next. We will also connect to Google Search Console (GSC).
Linking these accounts will help you understand your customers better and improve your marketing. You can also use attribution reports to see which marketing efforts are most effective, import Analytics conversions into Google Ads for bidding, and use Analytics audience data to enhance Google Ads remarketing. Yup, lots you can do. You’ll learn it all and grow your business with the best knowledge to make the best marketing decisions.
Let’s set up your Google Ads links now. Watch the Migration Series Day 5: Ads links, user roles, and more, and that will help you set up the Google Ads link easily.
If it is not easy, not to worry. We’ll be adding that video walkthrough in the next few days. We’ll be back to add the step-by-step account linking, but we will now check if off and call it done.
In the next few days, we’ll also add the How to set up your Conversions using Tag Manager and GA4 set up video. You need to set up tags in Tag Manager to have everything configured.
These other videos might be helpful as well. – The last step to all of this madness. So bookmark this and come back!
Some other videos to help with the Google ads if you are raring to go.
Google Ads Linking in Google Analytics
Setting up the Google Ads integration in Google Analytics
Additional GA4 Resources
Google Ads Linking in Google Analytics
Setting up the Google Ads integration in Google Analytics
Migration Series Day 1: What, why, and how to migrate to Google Analytics 4 Migration Series Day 2: Tagging and Data Streams in Google Analytics 4 Migration Series Day 3: Events and conversions in Google Analytics 4
[UA→GA4] Recreate Universal Analytics audiences
[GA4] Add a Google Analytics 4 property (to a site that already has Analytics)
[GA4] About connected site tags – Analytics Help
[GA4] Confirm that you’re collecting data – Analytics Help
Unable to sign in to account – Analytics Help
Measure activity across multiple domains | Tags | Google for Developers Conversions in Google Analytics
Creating Events in Google Analytics 4 Properties
Google Analytics 4 Tutorials – YouTube
Migration Video Series Live on YouTube
Meet Google Analytics 4: Google’s vision for the future of analytics
Introducing the new Google Analytics
Activate Google signals for Google Analytics 4 properties
A new way to unify app and website measurement in Google Analytics
Meet the next generation of Google Analytics
Universal Analytics versus Google Analytics 4 data
Getting started with the Google Analytics 4 Property
Connecting a Google Analytics 4 Property to an existing UA Property
Product Deep Dive: The New Google Analytics
Getting Setting up the Google Analytics 4 Property with Google Tag Manager
Walkthrough of the Google Analytics 4 User Interface